My personal insecurity comes out after an evening of wrenching in Killa’s Garage. I wake up at three AM unsure of whether I have properly tightened all the critical bolts on a friend’s bike. I can’t go back to sleep until I have sent my friend a note to check that whatever I worked on is tight.
Most concerning for me are the cable fixing bolts on the derailleurs and brake calipers, especially on the brake calipers.
I worry about this because as I am stringing up a component, I make a preliminary guess on cable tension then snug down the cable clamp bolt just enough to operate the component and check my guess. Then I loosen the bolt a bit, make any adjustment, and do the final tightening. This way I don’t mash the cable in more than one place. It is essential that I remember to perform the final tightening step on each clamp bolt.
In case you were wondering, Shimano’s recommended torque for derailleur and brake fixing bolts is 6-7nm.
So I walk around the bike with 4mm and 5 mm wrenches and talk to each bolt (all of them, not just the cable clamping bolts) one final time before taking the bike down off the rack. “Hello, front derailleur mounting bolt, did I loosen you today? Did I retighten you…?” I don’t think this means I’m crazy, as long as they don’t start talking back.
Pro Tip for Cable installation: Don’t cut any cables until you have everything strung up and working. It is relatively easy to pull and re-thread an uncut cable. A cut cable will likely fray and become a throw-away.
Pro Tip for Front Brake Re-Cabling: If you use a fork mount work stand as I do, you can’t make front brake adjustments with the bike on the work stand because, well, the front wheel is not there. Keep a block of wood (or something else) handy that is a little wider than an average rim. Use this block to make a preliminary adjustment of cable tension with the pinch bolt.
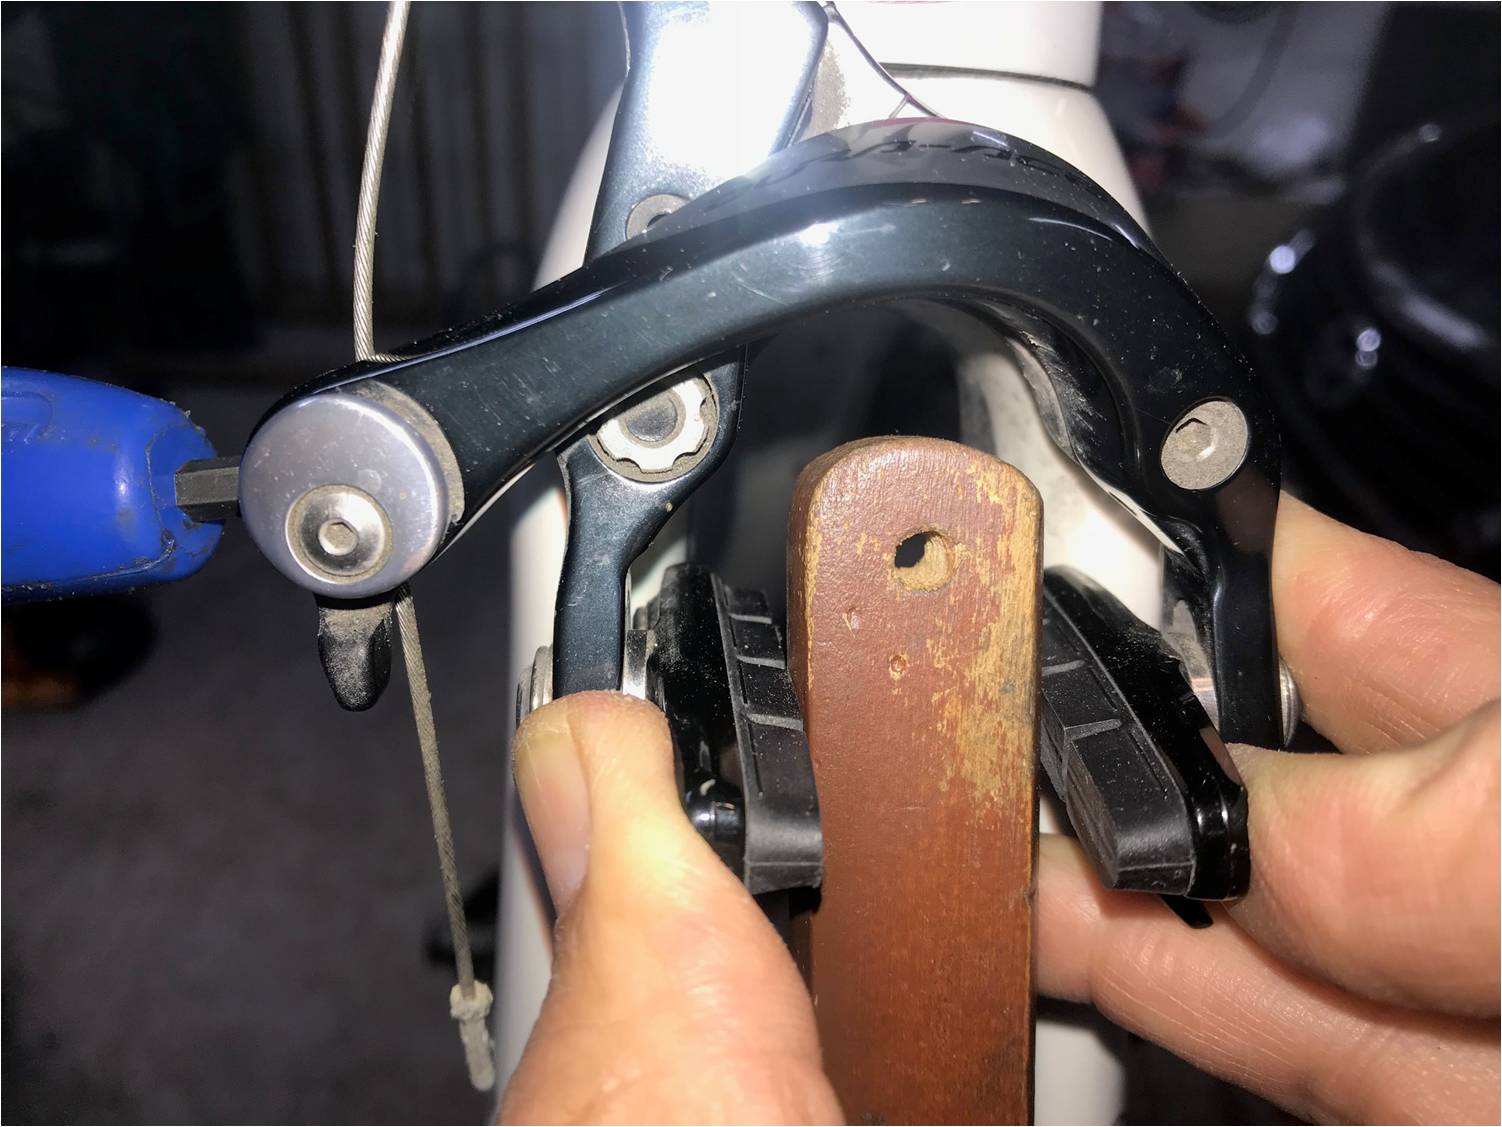
Writing this post has given me two continuous improvement ideas: 1. Attach a small T-bar across the top of my wood block so it will stay in position without brake pad pressure. 2. Attach the block to my workstand with a piece of string so it is always handy.
With a little practice you can get close enough on the first try so that you can make your final adjustment with the adjuster barrel alone. You still will need to center the brake with the wheel in place. But that’s easy if you follow my tutorial on Centering Dual-Pivot Brake Calipers the Right Way.
Killa, always enjoy your blog.
My two cents thoughts about your worry on safety: As a former Reliability Engineer, I suggest you create a checklist to go over the most critical items that could become a safety breach in case something is overlooked. You can have the checklist in your cell or on a piece of paper. Saving it might also erase the concerns/ worries since you can go back and look it at midnight, then roll back to bed as a happy and professional bike mechanic.
CM
Same problem here. 🙂
Remember calling a friend relatively early in the morning (on a workday, so new I wouldn’t wake him up) to say that I’m not 100% sure I had tightened all of his kickstand bolts to the proper torque. He laughed hard – knowing how much attention I pay to details, teasing me with that phonecall long afterwards.
On the more serious note, it is a potential problem. Loose brake cable bolt for example. The way I do it (any better/more practical ideas are more than welcome):
Made one order in which I always do things, so I don’t have to think, it’s become a habit.
After assesing what needs to be done on a bike I start with seatpost and saddle. Marking the seatpost insertion height with some paper tape before removing it.
Then wheels (if they need a job). And with wheels I start with hubs. Always. Then truing. Followed by rim tape and tyre. Rear first, then the front.
Then comes the fork. Again, if the fork or the headset need working on. Paper tape is placed on stem bolts, reminding me to check the preload and tighten them properly. This, along with the derailleur cable anchor bolts is the only place where I leave final tightening for later.
Cranks and bottom bracket – in that order, of course.
Then the chain.
Rear derailleur, followed by the front one (don’t know why, but always in that “reversed” order).
Bars and levers.
Wheels get put back (if they had been removed).
Cables, housing and tuning everything.
When tuning, I set brake cable bolts to the proper torque as I finish tuning that brake. Front first, then rear.
With derailleurs, I wait until both of them are working fine before tightening both cable anchor bolts. First tuning the rear, then the front.
Final headset preload check and tightening all the bolts/locknuts.
Test ride – always. After that, I send the customer a message that the bike is finished, and note that in my book – that the customer had been informed. That also means the bike is finished.
Few minutes to write in my database the state of the bicycle – whether someting needs fixing soon, when I recommend the next service etc.
If I get interrupted, or need to place another bike on the stand for a quick tyre fix and the like, I mark with paper tape the part where I was inerrupted. The one that needs working on, not the last finished one.
I find this easier, simpler and faster than going over a “classic” checklist in the end. So far so good. It’s basically a 15-step procedure. Skipping the steps for things that don’t need service (or customer doesn’t want serviced).
As for the service-client approach, I’ve written it down here:
https://bike.bikegremlin.com/2018/08/09/approach-to-bicycle-servicing/