Yes, this relates to today’s Esoteric Observation on Bicycles and Cycling – Image from Space.com
I never meant for this to become Killa’s Esoteric Observations on Aluminum Corrosion blog, but here we are. In a recent post I wrote about a corroded stem face plate on a friend’s bike. Another episode of aluminum corrosion was brought to my attention recently in a pretty spectacular manner.
The rider in front of me (Let’s call him RocketMan) suddenly lost control and fell on straight level ground. He might have hit a bump or something, or not. Read on. I and another rider swerved around him but the third rider back (We’ll call him Mario) T-boned RocketMan, broke a few of RocketMan’s ribs, destroyed his (Mario’s) classic steel Masi frame, launched over the bars, and fractured a vertebra upon touchdown (but that’s another story.)
Pardon a brief diversion to the topic of bicycle wheel engineering. Mario reported to me that despite absorbing enough force to buckle his frame tubes, his front wheel remains absolutely true!
Back to aluminum corrosion. This is not an article about the crash, but rather about the cause. The primary cause of this crash was, in my opinion, a corroded handlebar.
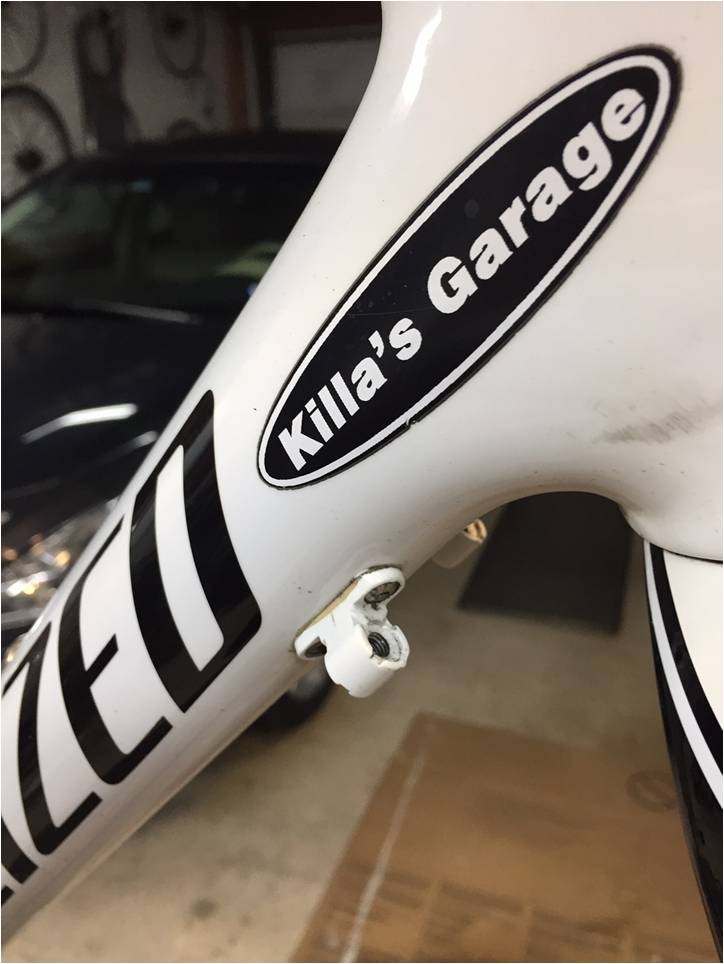
The bicycle of RocketMan ended up in my garage because, well, I’m the guy’s mechanic. Both drops (Drops are the lower curved ends of road bicycle handlebars) of his aluminum handlebars were broken. The right drop was completely broken off, the left was still attached by about a quarter of the circumference of the aluminum tube.
Aluminum bars usually bend. They don’t usually break. And RocketMan fell on his left side, so how did he break the right drop? I only had to un-wrap his handlebar tape to see that corrosion had eaten through most of the metal just above the brake levers – exactly where sweat drips off your hands and collects under the tape.
What I think happened to cause this crash is that RocketMan hit a small bump while riding on the drops, or corrosion simply reached a critical level. I think his right drop broke off first, causing him to lose control and fall. The left drop, I think, broke on impact with the ground.
The evidence suggests crevice corrosion just like the stem face plate I wrote about previously. Here the interface between tape and handlebar creates the crevice, and sweat is the electrolyte. That white stuff is not salt, It’s aluminum hydroxide. And there was a lot of it under the tape!
I’ve seen plenty of corroded handlebars over the years. I’ve seen scary-corroded bars that I thought would crumple like paper that I couldn’t bend or break. These were the worst I’ve ever seen. A metallurgical analysis of the remaining metal would be very interesting, for a certain definition of interesting.
Some riders will go without changing tape for five years. (Oh, you’re supposed to change it?) RocketMan’s bars had been taped up and ridden for about 15 months, not unusually long, but most of it in very sweat-inducing Texas heat and humidity. How much do you sweat? How often do you look under the tape on your bars?
Let’s take a few lessons from this failure:
Inspection, inspection, inspection. Look under your tape every six months or so, especially if you ride in hot humid climates. It’s relatively easy to un-tape back to the levers and re-wrap.
Or just go ahead and change tape more frequently. It’s pretty cheap, and everyone knows that new tape makes you faster. This is a result of the well-known “New Stuff Principle”.
Change your handlebars if they’re corroded.
I’ve never been a fan of carbon fiber handlebars (because they tend to break on impact rather than bend) but at least they don’t suffer from this insidious failure mode. It’s something to consider if aluminum bars don’t last for you.
By the way, RocketMan is a retired space shuttle astronaut. In one of those cosmic coincidences of life the aluminum oxidation process that caused his crash is the same chemical reaction that powered his Space Shuttle solid rocket boosters.
Scan the picture at the top of this article quickly. What jersey would you rather be wearing on roads full of distracted drivers?
Riding in Daylight
About ten years ago a good friend of mine confessed that he always wears a fluorescent yellow jersey when he rides his bike. At the time my collection of jerseys included – like many of you, I’m sure – an assortment of team colors and charity ride commemorative tops. I felt that, well, hi-viz yellow is kinda’ dorky. I didn’t tell my friend that, of course. But I remember the conversation like it was yesterday, and it started me thinking.
Then about five years ago another friend described his observations concerning jersey color during a cross-country ride from Seattle to Miami. He noticed that in a group of riders a mile or so up the road, the only rider he could always spot was the one in hi-viz yellow. The rest, in various team kit colors, might as well have been wearing camouflage. Road-camo he called it. That conversation convinced me.
I’ve been buying nothing but hi-viz yellow jerseys ever since. I still have some road-camo jerseys, and I still wear them when my hi-viz yellows are dirty, but I wear the yellow whenever I can, and I’m tossing the older jerseys as they age.
I also found a deal on a six-pack of bright yellow socks (six pairs, twelve socks, Pearl Izumi if you must know). I wear these socks exclusively when I ride. I think that my yellow-clad ankles bobbing up and down provide a strong association with the concept of cyclist in the minds of drivers. I also like to think that this association will cause a driver to avoid me rather than run me down. What do you wear when you ride?
Riding in the Dark
Fluorescent yellow is great in daylight, but at night it just looks sort of gray. You need lights and reflective surfaces when it’s dark.
Retroreflective material is that silver-looking stuff sewn into the seams or in patches on some clothing. It’s amazing stuff. Try taking a flash picture at night of someone wearing a patch of retroreflective material. You can’t. The stuff throws so much light back at you that it ruins your exposure, leaving everything else in darkness.
Reflectivity is great, if the car/bike/runner/hog/deer hurtling toward you has lights. If not, there’ll be no light to reflect. You need active lighting. Red in back and white in front seem appropriate. I’ve no data to back this up but I believe this color choice helps orient you in others’ minds as approaching or receding. I don’t know what the hogs and deer think.
You also need a headlight to be able to see where you are going. Hogs and deer don’t wear reflectors. There are lots of affordable rechargeable lights available that will throw enough light to see and be seen. I like at least 400 lumens in front and 100-200 lumens in back. Once you’ve made the investment in rechargeable lights, why not run them in daylight too? Most of these lights will run for many hours in flash mode, and they’re bright enough to garner attention even in sunlight. Did you notice the headlight in the picture?
Taillights, in my experience, are highly directional. Be sure yours is aimed towards the rear, maybe slightly left (slightly right in England?) and level. If you clip your tail light to your seat bag or clamp it to a seat-stay, there’s a good chance it is pointing to the ground or up into the eyes of the rider behind you, and not back down the road. Do this: Lean your bike against a post or something, turn on your taillight, and walk back about 100 feet. What do you see? Move left, right, up, down. Adjust your light so the brightest action is where a driver would be sitting as he approaches you.
Are you safe because you look like a construction worker in hi-viz yellow and you’re all lit up. No, you could still get hurt in a number of ways. But at least you’ve greatly reduced the chance of someone looking down at you on the ground and saying “Sorry, I didn’t see you”.
My personal insecurity comes out after an evening of wrenching in Killa’s Garage. I wake up at three AM unsure of whether I have properly tightened all the critical bolts on a friend’s bike. I can’t go back to sleep until I have sent my friend a note to check that whatever I worked on is tight.
Most concerning for me are the cable fixing bolts on the derailleurs and brake calipers, especially on the brake calipers.
I worry about this because as I am stringing up a component, I make a preliminary guess on cable tension then snug down the cable clamp bolt just enough to operate the component and check my guess. Then I loosen the bolt a bit, make any adjustment, and do the final tightening. This way I don’t mash the cable in more than one place. It is essential that I remember to perform the final tightening step on each clamp bolt.
In case you were wondering, Shimano’s recommended torque for derailleur and brake fixing bolts is 6-7nm.
So I walk around the bike with 4mm and 5 mm wrenches and talk to each bolt (all of them, not just the cable clamping bolts) one final time before taking the bike down off the rack. “Hello, front derailleur mounting bolt, did I loosen you today? Did I retighten you…?” I don’t think this means I’m crazy, as long as they don’t start talking back.
Pro Tip for Cable installation: Don’t cut any cables until you have everything strung up and working. It is relatively easy to pull and re-thread an uncut cable. A cut cable will likely fray and become a throw-away.
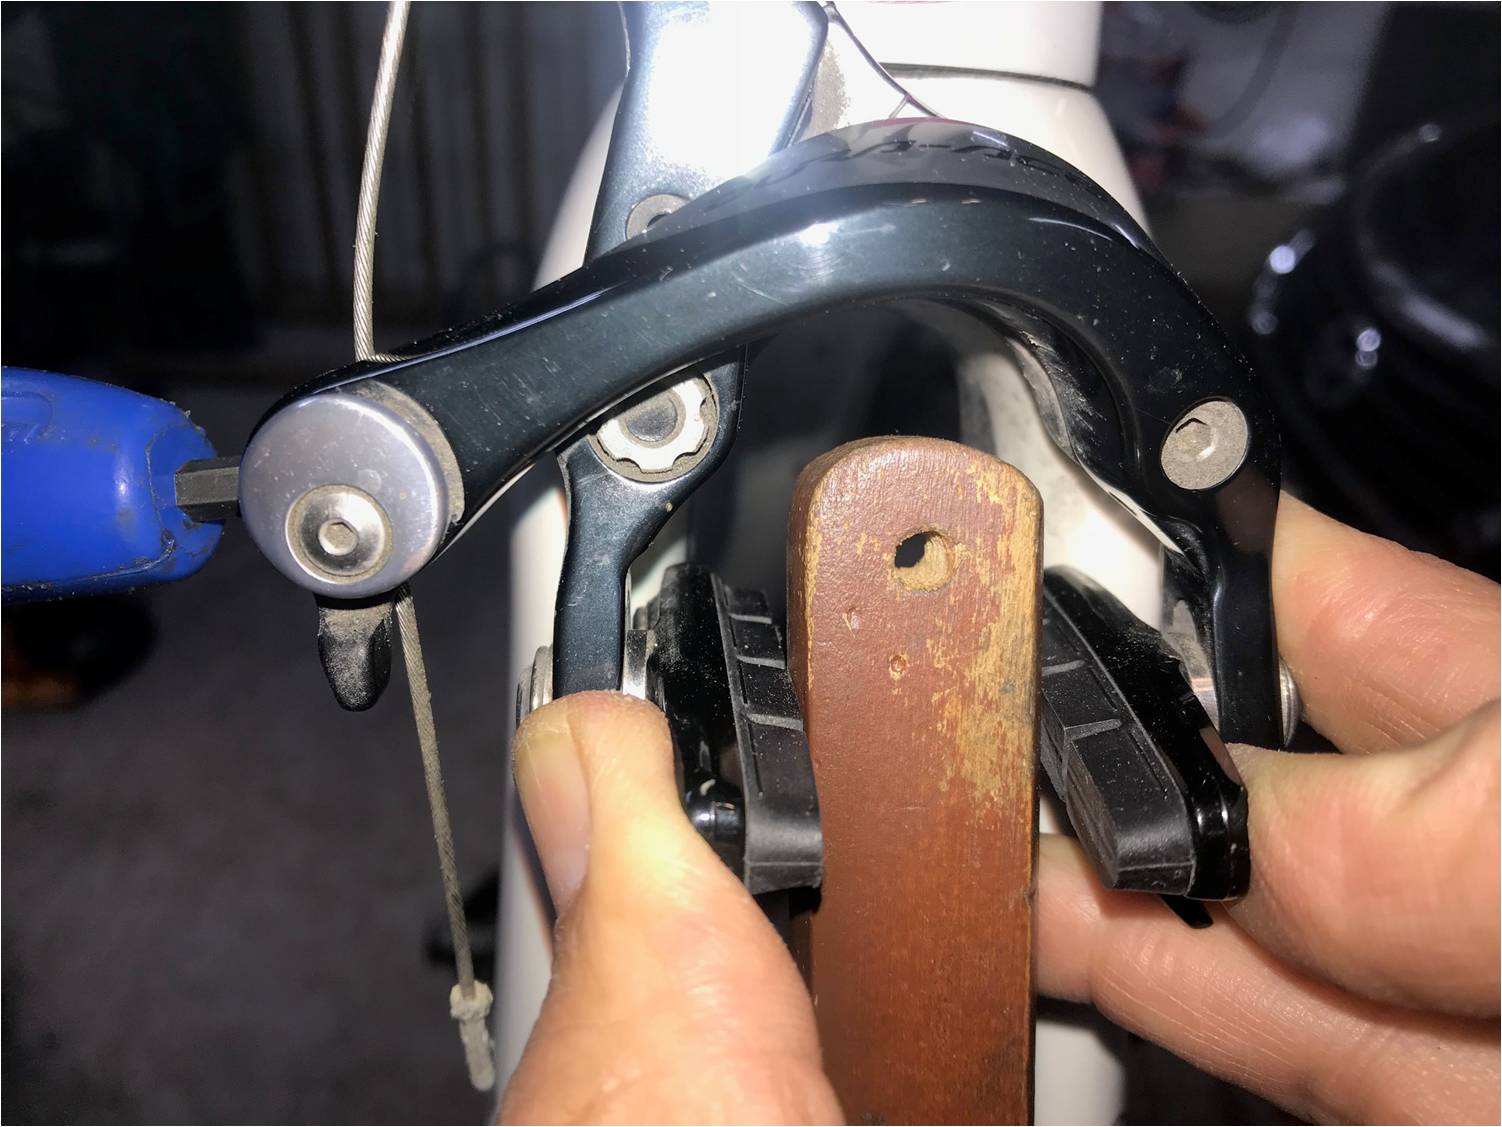
Pro Tip for Front Brake Re-Cabling: If you use a fork mount work stand as I do, you can’t make front brake adjustments with the bike on the work stand because, well, the front wheel is not there. Keep a block of wood (or something else) handy that is a little wider than an average rim. Use this block to make a preliminary adjustment of cable tension with the pinch bolt.
Writing this post has given me two continuous improvement ideas: 1. Attach a small T-bar across the top of my wood block so it will stay in position without brake pad pressure. 2. Attach the block to my workstand with a piece of string so it is always handy.
With a little practice you can get close enough on the first try so that you can make your final adjustment with the adjuster barrel alone. You still will need to center the brake with the wheel in place. But that’s easy if you follow my tutorial on Centering Dual-Pivot Brake Calipers the Right Way.
Philip (not Eric’s real name) was starting his morning ride. As he hit the little bump at the end of his driveway, his handlebars rotated loosely downward. I wasn’t there, but I imagine that as he thought he was about to do an up-close inspection of the ground around his front tire he said “Oh, shoot” or something like that.
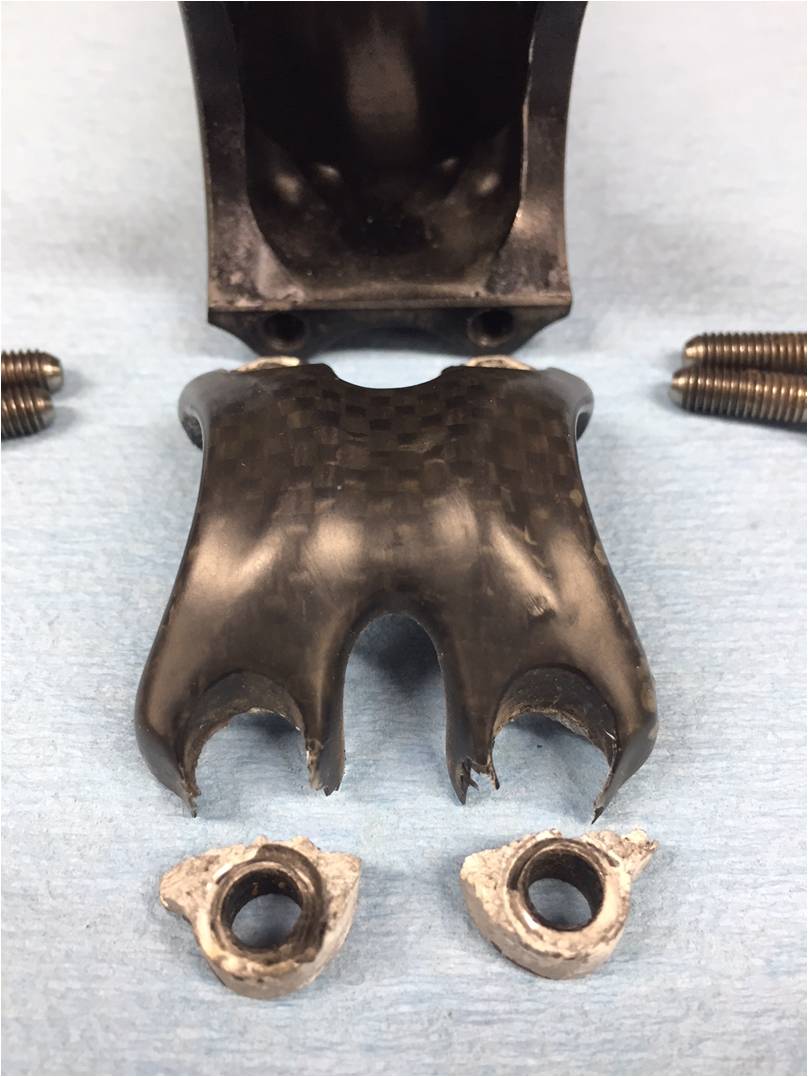
The faceplate on his handlebar stem had failed.
Note: This is not carbon fiber. It is a faux carbon paint effect on an aluminum faceplate. Separation of the paint from the aluminum under it may have contributed to the corrosion. Read on.
Fortunately the faceplate structure and the remaining two bolts, while insufficient to prevent rotation, did prevent total and immediate separation of his bars from his stem, allowing him to maintain control.
This might be a good time to go look at the bottom of your stem and see if there is a mass of white crumbly powder around the bolts. I’ll wait…
Yes? Interestingly that’s not salt, though its presence is due to the presence of the chloride in your sweat. It is aluminum hydroxide, produced by crevice corrosion, as described in this article on Corrosion of Aluminum and Its Alloys: Forms of Corrosion and a slew of other scholarly articles on the topic.
The aluminum in the aluminum hydroxide came from your stem, and it is a sign of deterioration in a critical high-stress area.
Sweat drips off your chin onto the stem (especially if you ride hunched over areobars or on a stationary trainer), gets in the crevices around the bolts, and creates a reaction cell, which strips aluminum from your stem faceplate to generate the aluminum hydroxide.
A couple of other nasty places for crevice corrosion are under your handlebar tape and at the rear brake cable stop on your top tube.
I don’t know why, but some people really do seem to have more corrosive sweat. Maybe it’s got to do with pH, or salinity, or some organic components. Don’t send me samples of your sweat. I’m really not that interested.
Sometimes I apply a thick anti-oxidant paste made for use on aluminum house wiring to prevent this form of corrosion.
And Now a Totally Tangential Esoteric Observation:Aluminum loves to oxidize!
Aluminum is generally corrosion-resistant. This is because aluminum oxide forms a hard smooth protective film on the surface of otherwise unprotected aluminum. Aluminum oxide is so passive because it exists in a low energy state. It’s in this low energy state because aluminum gives up lots of energy when combined with oxygen. Aluminum is in fact a common ingredient in solid rocket propellant.
Thermite is another widely used fun and practical application of aluminum oxidation. Powdered aluminum and powdered iron oxide (plain old rust) are mixed together. Something pretty hot, like a fireworks sparkler, is applied to get the reaction kicked off, and all the oxygen moves from the iron to the aluminum. It doesn’t explode. It just burns vigorously. The reaction is so exothermic that the mixture becomes molten! The heavier iron sinks to the bottom, while the lighter aluminum oxide floats to the top. The process is handy for esoteric jobs like welding railroad rails together and rendering cannons unusable before capture by an enemy. Oh, and The Mythbusters do a really good episode where they use thermite in an attempt to cut a car in half.
I recently posted about my experience with SRAM’s ETAP system. It doesn’t have much by way of optionality. You click, it shifts. It will display current gear selection on an ANT+ device, and that’s about it. There is apparently a wireless communication protocol for firmware updates via a USB dongle, but SRAM has yet to issue any updates, so I’m just assuming that functionality really exists.
Anyway my friend Dan, AKA 6-0, just got a Canyon with the newest Ultegra Di2 groupset. Talk about feature-packed. It can be set up for manual, semi-synchro, or full-synchro modes. It will transmit to your display unit (Garmin et al) current gear selection, battery condition, and even a signal when it is about to change chainrings, because, yes, in Synchro mode it will change chainrings if required to get to the “next gear”.
With so much optionality, it behooved (behove?) Shimano to design a connection to smartphones to make configuration changes, and sure enough they did. There is even a plug-in device to upgrade older Di2 to the new capability. But setup of all the wires and signals is apparently not exactly intuitive.
Dan, being the thoughtful guy he is, wrote out some tips and hints on the setup process, including some really useful links to YouTube videos, etc. So without further ado, here are Dan’s Esoteric Observations On:
INSTALLING AND SETTING UP WIRELESS COMMUNICATION WITH SHIMANO DI2 SHIFTING
28 JUNE 2018
By Dan Denham
This guide is intended to assist persons who have Shimano Di2 shift systems that are capable of communicating with bike computers via ANT+ and Bluetooth to smart devices. This requires the system to have Shimano [smart] batteries such as those found in the new Ultegra 8000 Di2 group set and the Dura-Ace 9100 group set. These may be internal or external to the bike frame. For Bluetooth communication, older Di2 systems must have their batteries upgraded to Shimano smart batteries, and install a small “D-Fly” ANT+/BT LE wireless unit in order to communicate with handheld smart devices (see Final Note at the bottom). Communicating with bike computers enables the rider to view various data fields related to the status of gearing, shift mode, and battery condition. The Di2 system can also be periodically and temporarily connected via Bluetooth LE (herein also referred to as Bluetooth, BT LE, or BT) to easily update firmware or make programming changes to shifting methods and to button functions.
This guide is not intended to explain the numerous ways that Di2 wiring configurations and connections may be made. For that, the reader should consult the User Manual or Dealer’s Manual for Di2 shift system which is readily available online at Shimano’s website (see reference below).
From reading user reviews (and by personal experience), connecting a smart device to Di2 for the initial connection has a high probability of failing during the initial firmware update. At this point, the Di2 system is likely to be unresponsive (“bricked”) and can only be restored by connecting with a PC and running the E-TUBE program.
Di2 SYSTEM REQUIREMENTS:
Shimano Di2 Groupset – any generation
Shimano Smart Battery BT-DN110 (internal) or BM-DN100 (external)
Wireless Unit – recommend “D-Fly” Bluetooth LE / ANT+ capable unit EW-WU111 (connection ports on opposite ends) or EW-WU101 (connection ports on same end).
You will need an extra connection wire to insert the wireless unit into the system. Use the length appropriate to where the unit is installed. 150mm is the shortest available.
Cheap ($4-$7) Shimano TL-EW02 tool recommended to avoid damaging connectors.
Shimano USB unit and cable (Di2 battery charger SM-BCR2 or SM-PCE1 PC interface device) to connect the Di2 group set to PC computer. These connect to the Junction A box charging port and are only required to set up the system the very first time. They are not needed again if you plan on connecting via a Bluetooth smart device thereafter.
E-TUBE Project program for PC. For smart phones and tablets, download and install respective E-TUBE apps (see References below).
PRELIMINARY SETUP REQUIREMENTS:
Install Di2 System Required items listed above, as needed. There are various ways to install them. Refer to appropriate manuals, diagrams, or YouTube videos for installing them.
Ensure that the Di2 battery has sufficient charge prior to initial connection, especially new bikes and batteries.
Ensure that the PC desktop will not accidentally lose power or shut down during initial connection. A PC laptop with a fully charged battery is better.
Download and install the E-TUBE program to the PC.
Ensure that the initial connection to Di2 is performed where the PC has a strong wireless signal and it is connected to the web. It will check online to find the latest firmware versions of all Di2 components and download newer versions if available.
GENERAL WORKFLOW:
Install D-Fly wireless unit (and smart battery if necessary) in/on bicycle.
Connect bike computer to the Di2 system via ANT+ to add Di2 communication between the two.
Connect PC to the Di2 system via the E-TUBE Project program and run the program to view and make desired changes to Di2 gearing, shift speed, BT passkey, etc.
Disconnect E-TUBE Project program via the program menu choice to turn off the Di2 system BT signal.
Connect smart device wirelessly to the Di2 system via the E-TUBE app for it to view and make changes.
Disconnect the smart device through the app settings as in Step 4 above. The shifters will not respond if the app and BT are still connected. Leaving BT on in the Di2 system rapidly drains the Di2 battery.
CONNECTING YOUR BIKE COMPUTER TO THE Di2 SYSTEM VIA ANT+
When installing the wireless unit, do not complete the tie-down or closing up the access point until you have successfully communicated with your bike computer. You will have to disconnect the unit and reconnect it to complete the process (according to the User’s Manual for the EW-WU111 unit).
After installing the wireless D-Fly unit to the Di2 system, put your bike computer into connection mode in the same way you did to recognize other ANT+ components such as speed and cadence sensors. Let your computer search for the Di2 device and then add it to your bike computer’s list of connected ANT+ components. You may wish to check data fields on your bike computer at this point if you have any set up.
You may need to disconnect and reconnect the battery to complete the setup if you do not see any data. If you have an external battery, remove it and reinstall it. If you have an internal battery, disconnect the wireless unit from the system (at both of its ends to ensure that it is not still connected to the battery). Wait a few moments and reconnect it. Wait about 30 seconds for the wireless unit to begin transmitting again. Note: It may also take this long for you to see Di2 data fields populate when you start a new ride.
You may finish physical tie-down or mounting at this point since you should not have to make further disconnections to the wireless unit. Or you may wish to finish this after making BT LE connections to smart devices.
CONNECTING YOUR Di2 SYSTEM TO THE E-TUBE PROJECT PROGRAM
It is highly recommended that you make your very first connection using a PC and the PC E-TUBE program before connecting with BT using a smart phone or tablet. If you make the initial connection with a BT-connected smart device, it often fails while updating the firmware of the individual Di2 components. Since the PC is hard-wired to your Di2 system and there is no passkey, PIN, or code required to make the connection, there is little likelihood of failure during the initial connection setup process. The PC program also allows you to set the BT passkey that you can use later with smart devices. If you make the initial connection with a smart device, you will enter the default 000000 BT passkey, change it to a new one, update or attempt to update firmware, forget the BT device, connect and enter the new passkey, while risking failure and “bricking” the Di2 system.
Connect your PC to the bicycle’s Di2 system with either an SM-BCR2 or SM-PCE1 to an SM-JC40/JC41 Junction A box through its charging port and a USB port on the PC, or an unused port on one of your Di2 system components. If you have an Ultegra 8000 Di2 system with a Junction A, connect your battery charger (SM-BCR2) cable in the charging port of the Junction A (SM-JC41) and the other end into a USB port on the PC. Other setups may require you to find an unused port on one of your Di2 components to connect an SM-PCE1 to.
Run the E-TUBE Project program to update firmware and change other settings such as BT passkey code to a personal one. Note: Each Di2 component has its own firmware version. It may take a few minutes to check and update all components. This allows the user to employ various vintage Di2 components (“Frankenstein” setup) and still work. However, note the battery and wireless component requirements above for ANT+ and BT connectivity. Shimano says that all Di2 components should work except the earliest generation. Shimano has a compatibility chart on its E-TUBE Project website (see References below).
Disconnect the program using the appropriate menu item. You should now be able to connect via smart device BT connection. See Step 4 for this.
To make a BT connection with a smart device (phone or tablet), ensure that its BT mode is turned on, start the E-TUBE app, and press the button on the Junction A box for about 1 second or until you see alternating red and green LEDs flash. The app will search until it finds the bike’s Di2 BT wireless signal and asks for the passkey. Enter the passkey you set up in Step 2 above. If you failed to set up a new passkey while running the program from a PC, the passkey will still be the default 000000. Enter that number. The app should ask you to set a new passkey. After setting the new passkey, disconnecting BT and closing the app, go to your smart device’s settings and forget the E-TUBE Project Di2 device since that is the only way to get rid of the default passkey on your smart device. Start the app again, press the Junction A button until its red and green LED lights alternate flashing, let the app find the E-TUBE Di2 system, and enter the new passkey. BE SURE TO DISCONNECT THE SMART DEVICE FROM THE Di2 SYSTEM THROUGH THE APP AND CLOSE THE APP. THE DI2 SHIFTERS WILL NOT WORK WHILE CONNECTED AND BATTERY DRAINAGE WILL BE ACCELERATED.
REFERENCES:
It is advisable to read all component manuals, user reviews, and watch videos on YouTube to educate yourself on installation, troubleshooting, and programming of Di2 wireless components and bike computers. The wireless unit will work with Garmin, Wahoo, and perhaps other BT-capable bike computers. Please confirm that your bike computer will work with ANT+ Di2 before purchasing a wireless unit.
Installing EW-WU111 to Canyon Aeroad 2018 This YouTube video shows how to install the transmitter inside the bottom bracket area of the bike on a Canyon Aeroad (Canyon Ultimate and Endurace Di2 bikes are wired the same). Please read the comments to the video since complications can arise fishing out the junction box as well as how to upgrade the firmware and reset the Di2 system after installing the transmitter. You will need snap ring pliers ($5 at Harbor Freight) to remove the plastic cover and a hook or needle nose pliers to fish out the Junction B box from the down tube. You should also use the small plastic TL-EW02 Shimano tool to break and make electrical connections.
Best price on EW-WU111 and extension wire is at JensenUSA.com. The length of extension wire depends on where you place or mount the wireless unit and where the battery is located if you place it inside your frame. The cheap TL-EW02 tool from Amazon for 2-day delivery (as Prime member).
Read reviews on the EW-WU111 on Amazon.com for discussion regarding installation and troubleshooting.
Watch other videos on YouTube to see how to program for full synchronous shifting (using rear shifter), continuous shifting, programing shifters and hidden buttons, and connecting to bike computers.
FINAL NOTE: I find the term “D-Fly” is confusing to me. I ask the question, is D-Fly the wireless unit, a bike computer that can communicate wirelessly with Di2, or is it simply the capability to communicate wirelessly between Di2 and a bicycle computer. It seems to depend on who is writing the article or manual. I find it best just to refer to the specific components being used, i.e., the wireless unit, the bike computer, ANT+/BT capable, etc.
Shimano’s latest electronic Di2 shift system does not allow you to cross chain from the small chain ring to the two outermost rear cogs.* Can’t do it. No over-ride, no opt-out. What!?!?
Every racer learns that when you get a flat you shift to the small chainring – small cog combination to facilitate getting your wheel out and a replacement in more easily.*** It’s also a good idea anytime you have to change a rear wheel. If you’ve got the latest Di2 and you’re running compact or mid-compact chainrings, you can forget that.
This all started with carbon braking surfaces. Rubber pads and aluminum rims make a great braking combination. There is a good consistent friction factor. They work reasonably well, wet or dry.
Then along came carbon fiber rims. The first generation retained the aluminum braking surface. So far, so good. The carbon is bonded to an aluminum hoop. The carbon is in some wheels structural (e.g. the original Zipp wheels), and in some a non-structural fairing (e.g. early Mavic Cosmic Carbone wheels; in current Mavic Cosmic wheels the carbon is still a non-structural fairing but it extends over the brake track. A complete aluminum rim is hidden inside the carbon shell. How weird is that?)
Inevitably suppliers did away with the aluminum and began making the entire rim out of carbon fiber. Well, it didn’t take long to learn that:
You need different (apparently very expensive given the price of a set of carbon brake pads) materials to make brake pads that will stop but not grind down your carbon fiber rims.
Even the best carbon rims with proprietary -enter marketing language here– surface treatment don’t stop as well as aluminum rims when wet.
Heat build-up in the rim during extended braking can cause temperatures in excess of the melting point of the carbon fiber resin. (It’s not really the melting point of the resin we are worried about. It’s the “glass transition temperature”, whatever.)
Aluminum conducts heat away from the braking surface better than carbon fiber. (I could be wrong about this but I don’t think I am.) Score a point for carbon fiber brake tracks. Your tires won’t get so hot. But the surface temperature of the carbon fiber brake track goes up more, and the pads get hotter too. Braking generates heat. It has to go somewhere.
So the designers borrowed disc brake technology from mountain bikes. Take the braking function off of the rim entirely. It’s elegant, but I feel like I’ve been driven by a series of small steps to a place I would not have gone all at once. If you are wondering what this has to do with being locked out from the last two cogs, hang on a bit longer.
Brief wheel design digression: Because a disc brake acts on the hub, braking force results in a torque between the hub and rim that is not present on rim brake wheels. This torque must be transmitted via the spokes to the rim. This is why you will not see radially spoked disc brake wheels. I recommend Jobst Brandt’s classic book “The Bicycle Wheel”.
Disc brakes generate eccentric loads, so frames become more complex and ultimately require thru-bolt axles to withstand the eccentric loads. (And to keep the front wheel secure in the fork dropouts.)
So we’ve come to the point where our road bikes have thru-bolt axles, because we wanted carbon fiber rims. What’s this got to do with Di2 and cross-chaining?
Did you know that thru-bolt hubs are wider than quick-release hubs – like 10mm wider. I suspect this has something to do with the mountain bike origins of thru-bolt technology. As described in Zinn’s FAQ column, the result is that the cassette on a thru-bolt wheel is about 5mm farther to the right.
But the chainrings are where they’ve always been. Cross-chaining is apparently so bad that the big chainring tries to pick up the chain if you are on one of the outer two cogs, especially on a racing geometry bike with short chainstays. So Shimano in their wisdom won’t even let you go there with Di2. I suppose if they could figure out a way to do this lockout with mechanical shifters they would?
Riding next to my friend Vic last week, I observed the lockout in action. Even though his bike was equipped with rim brakes and quick-releases, his shifters would not let him shift to the last two cogs while on the small chainring. (52-36 crankset) ****
*if you input chainring size difference of more than 14 teeth. So a 53-39 combination is OK; a 52-36 or 50-34 combination will invoke the lockout. I suppose you could hack the lockout by lying to the system about your chainring sizes.
** If you’re using SRAM ETAP I guess you’re on your own.
*** And if you have a rear flat you raise your right hand, your left for a front flat, to tell neutral support what kind of wheel you need. Does anyone know how to signal quick-release vs thru-axle?
****Dan, alias “6-0” just got a new Canyon Ultimate with Di2, disc brakes, and a compact crankset. With the chain on the small chainring and the third cog it really wasn’t too difficult to remove the back wheel because there is no quick release nut sticking out to the right.
This is a really tough episode of Esoteric Observations for me to get my head around. I hope it makes sense.
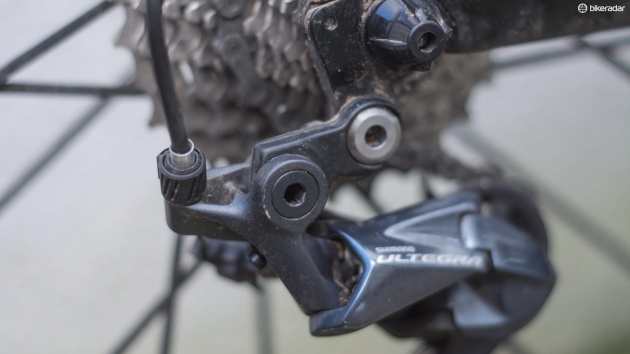
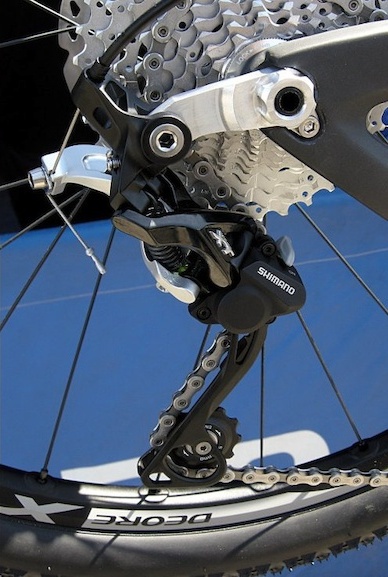
I installed my first Shimano Ultegra 8000 rear derailleur the other day.* It’s pretty unusual. The derailleur bolts to an adapter that Shimano calls a B-Link. The B-Link adapter bolts to the derailleur hanger. Shimano calls this a “Direct Mount” derailleur. It doesn’t look direct to me. It looks totally INDIRECT.
Normal rear derailleurs are direct mount. They bolt directly to the hanger. What gives?
Shimano proposed a new rear derailleur hanger standard in 2012. They called it Direct Mount. At the time it was targeted to mountain bikes. Their specification positions the derailleur mounting bolt about an inch to the rear of where Campagnolo standardized it 60 years ago.
Moving the pivot point back apparently improves shifting on “one by ten” and “one by eleven” gearing systems with those huge 40+ tooth cogs we see on mountain bikes.
By the way, WolfTooth and a few other aftermarket brands market hanger adapters that locate the hanger mounting bolt back, allowing “regular” derailleurs to accommodate larger cogs as well.
And many MTB manufacturers offer their frames with hangers positioned to the Shimano Direct Mount standard.
With aging bicycle consumers asking for larger cogs (lower gearing) on their road bikes, the 32 tooth capability of Shimano’s Ultegra 8000 (long cage version) is a good thing. If they have to move the pivot back an inch to do it, then I guess that is a good thing too.
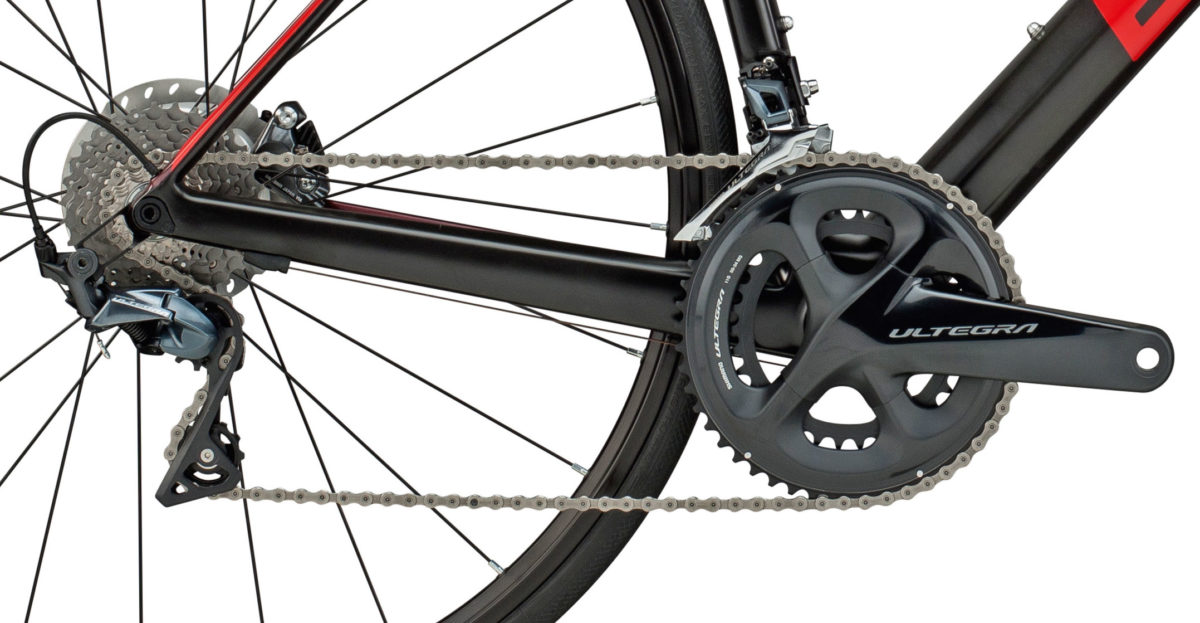
As far as I can tell, the only road bike currently available with a Direct Mount derailleur hanger is the BMC Team Machine. I came across this picture on BikeRumor.com.
So it makes sense to ship the B-Link adapter with the derailleur, as Shimano does, to mate to an ordinary hanger. However, virtually all hangers are replaceable items, so it can’t be too hard for bike makers or wheelsmanufacturing or derailleurhanger.com to tool up and churn them out as a retrofit or a new build option.
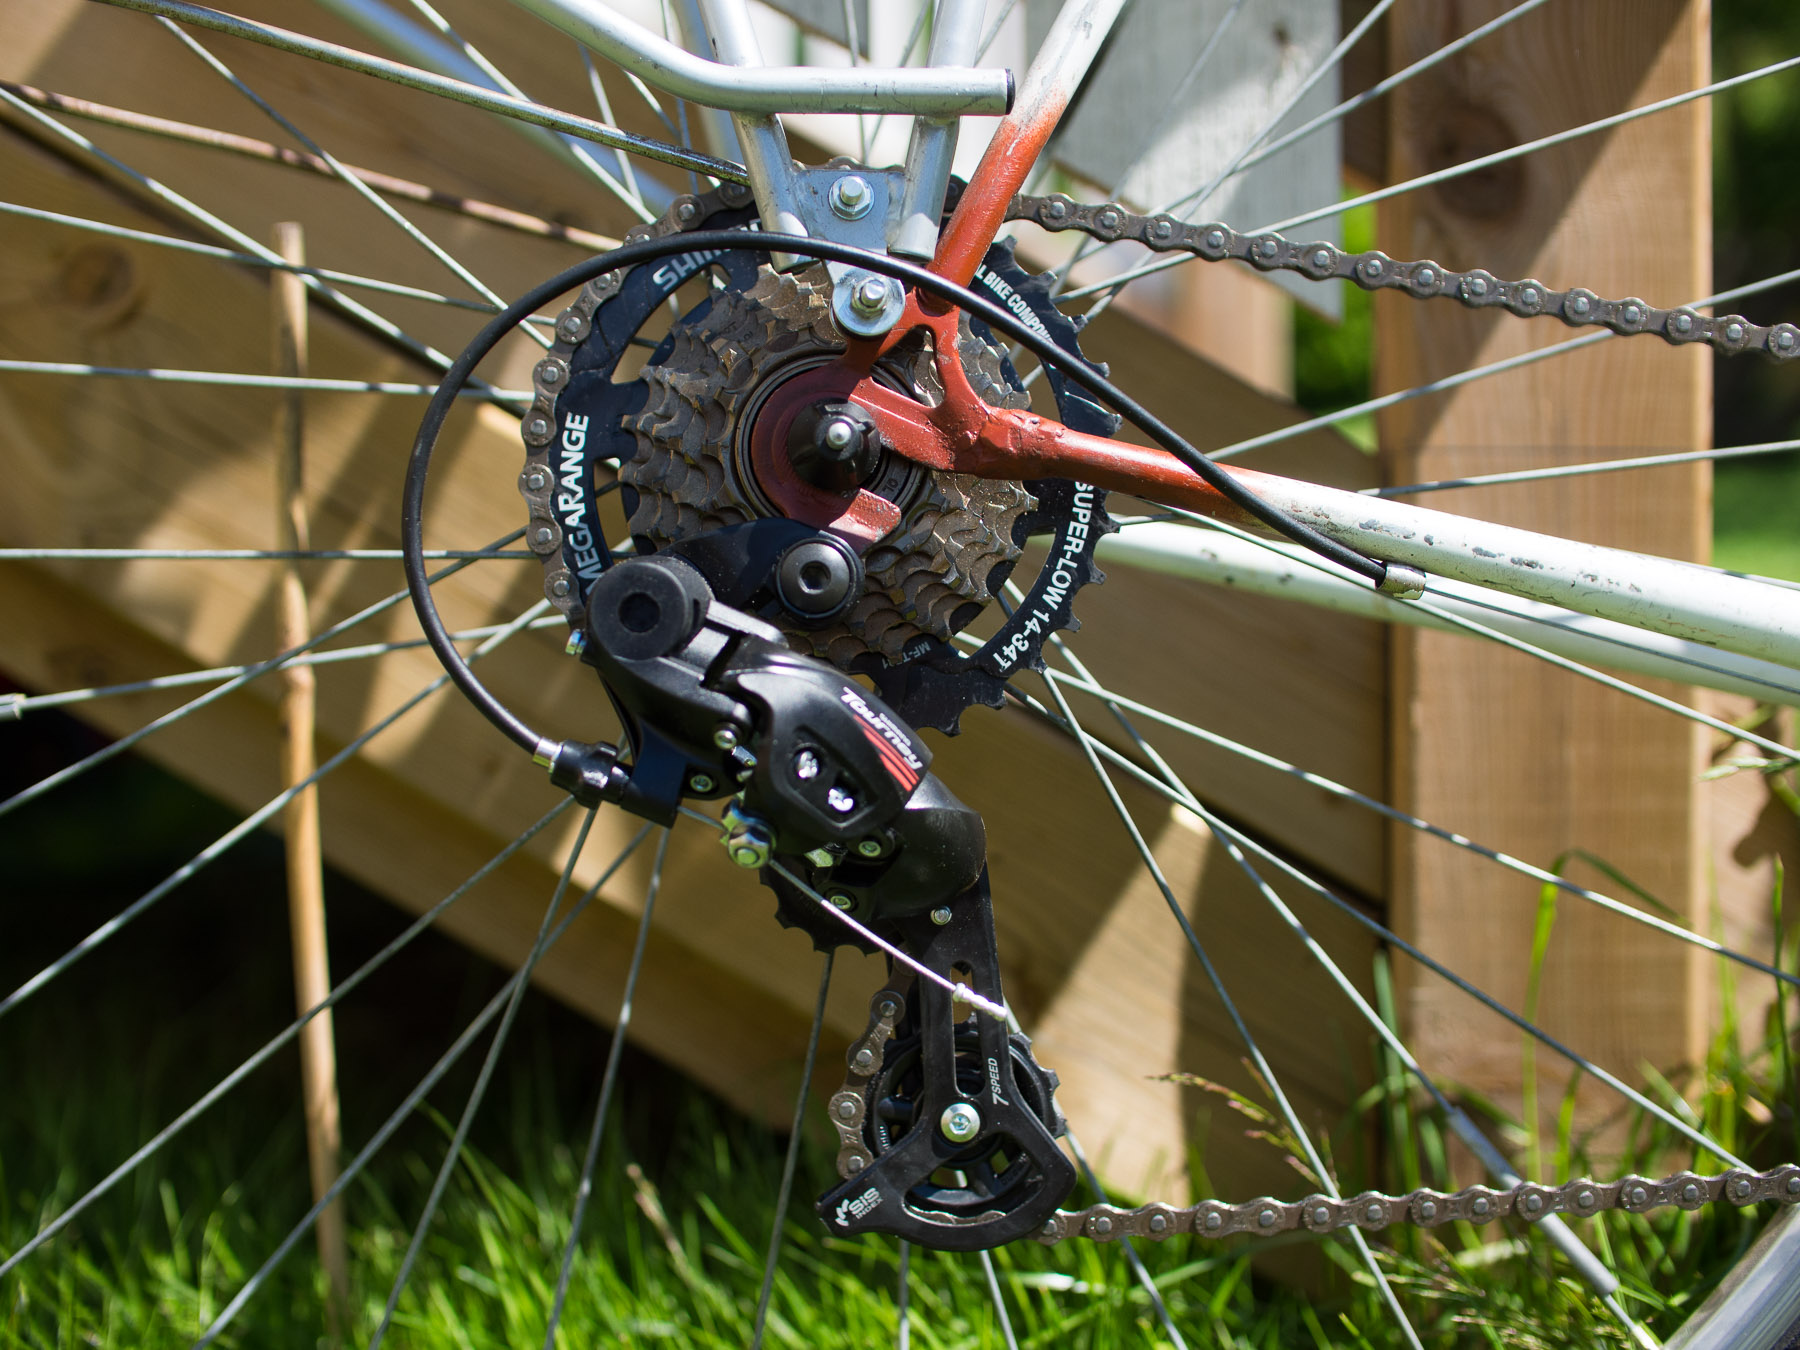
It gets weirder – Shimano was selling their low end Tourney derailleur in what is clearly a Direct Mount configuration before 2012. I see pictures on the internet from as far back as 2010 showing this design. It was mated to their then-labeled MegaRange wide range freewheel found on department store bikes. So is Direct Mount a case of trickle-up technology?
I found this picture in a conversation on StackExchange. Check out the horizontal dropouts. Bonus points for identification of the bicycle.
Anyway, Ultegra 8000 is only truly direct mount when mounted to a hanger manufactured to the “Shimano Direct Mount” specification – which hardly exists yet for road bikes! Saying it is stiffer and stronger, which they do, might be true when mated to a Direct Mount hanger. There is no way a Direct Mount derailleur … mounted to an adapter … mounted to a standard hanger … is stiffer and stronger**.
Would you like thru-bolts or quick release with that bike?
Stay with me. This is the confusing part. It all started with carbon fiber wheels. Rim brakes don’t work as well on carbon fiber, especially when wet, so we demanded disc brakes. Now that we have disc brakes, we need thru-bolt axles to withstand the off-center forces from the disc (and to ensure that the front wheel does not pull out of the fork). Hold that thought for a paragraph while I talk about derailleur hangers on quick release bikes.
Quick release bikes – The normal interface between a replaceable derailleur hanger and a dropout is in a very crowded location on a quick release equipped bike. The thickness of the derailleur hanger and the thickness of the dropout are limited. But it doesn’t have to be this way. There is no reason other than tradition that the hanger must be clamped between the locknut and the dropout. If the right rear dropout had a horizontal extension to the rear of the axle, the dropout could remain full thickness, and a hanger with the mounting hole in the traditional location, or in the “Direct Mount” position, or anywhere in between, could be attached to it. This hanger could be made as strong or as weak as you like.
Thru-bolt bikes – A thru-bolt dropout is not width-limited. Nor is it constrained by tradition. And they’re coming to road bikes, like it or not. A replaceable hanger, as thick as you like, can be thru-bolted to the outside of the dropout, providing the strength and stiffness necessary to support a hanger bolt location an extra inch and a half from the axle, just like on a mountain bike.
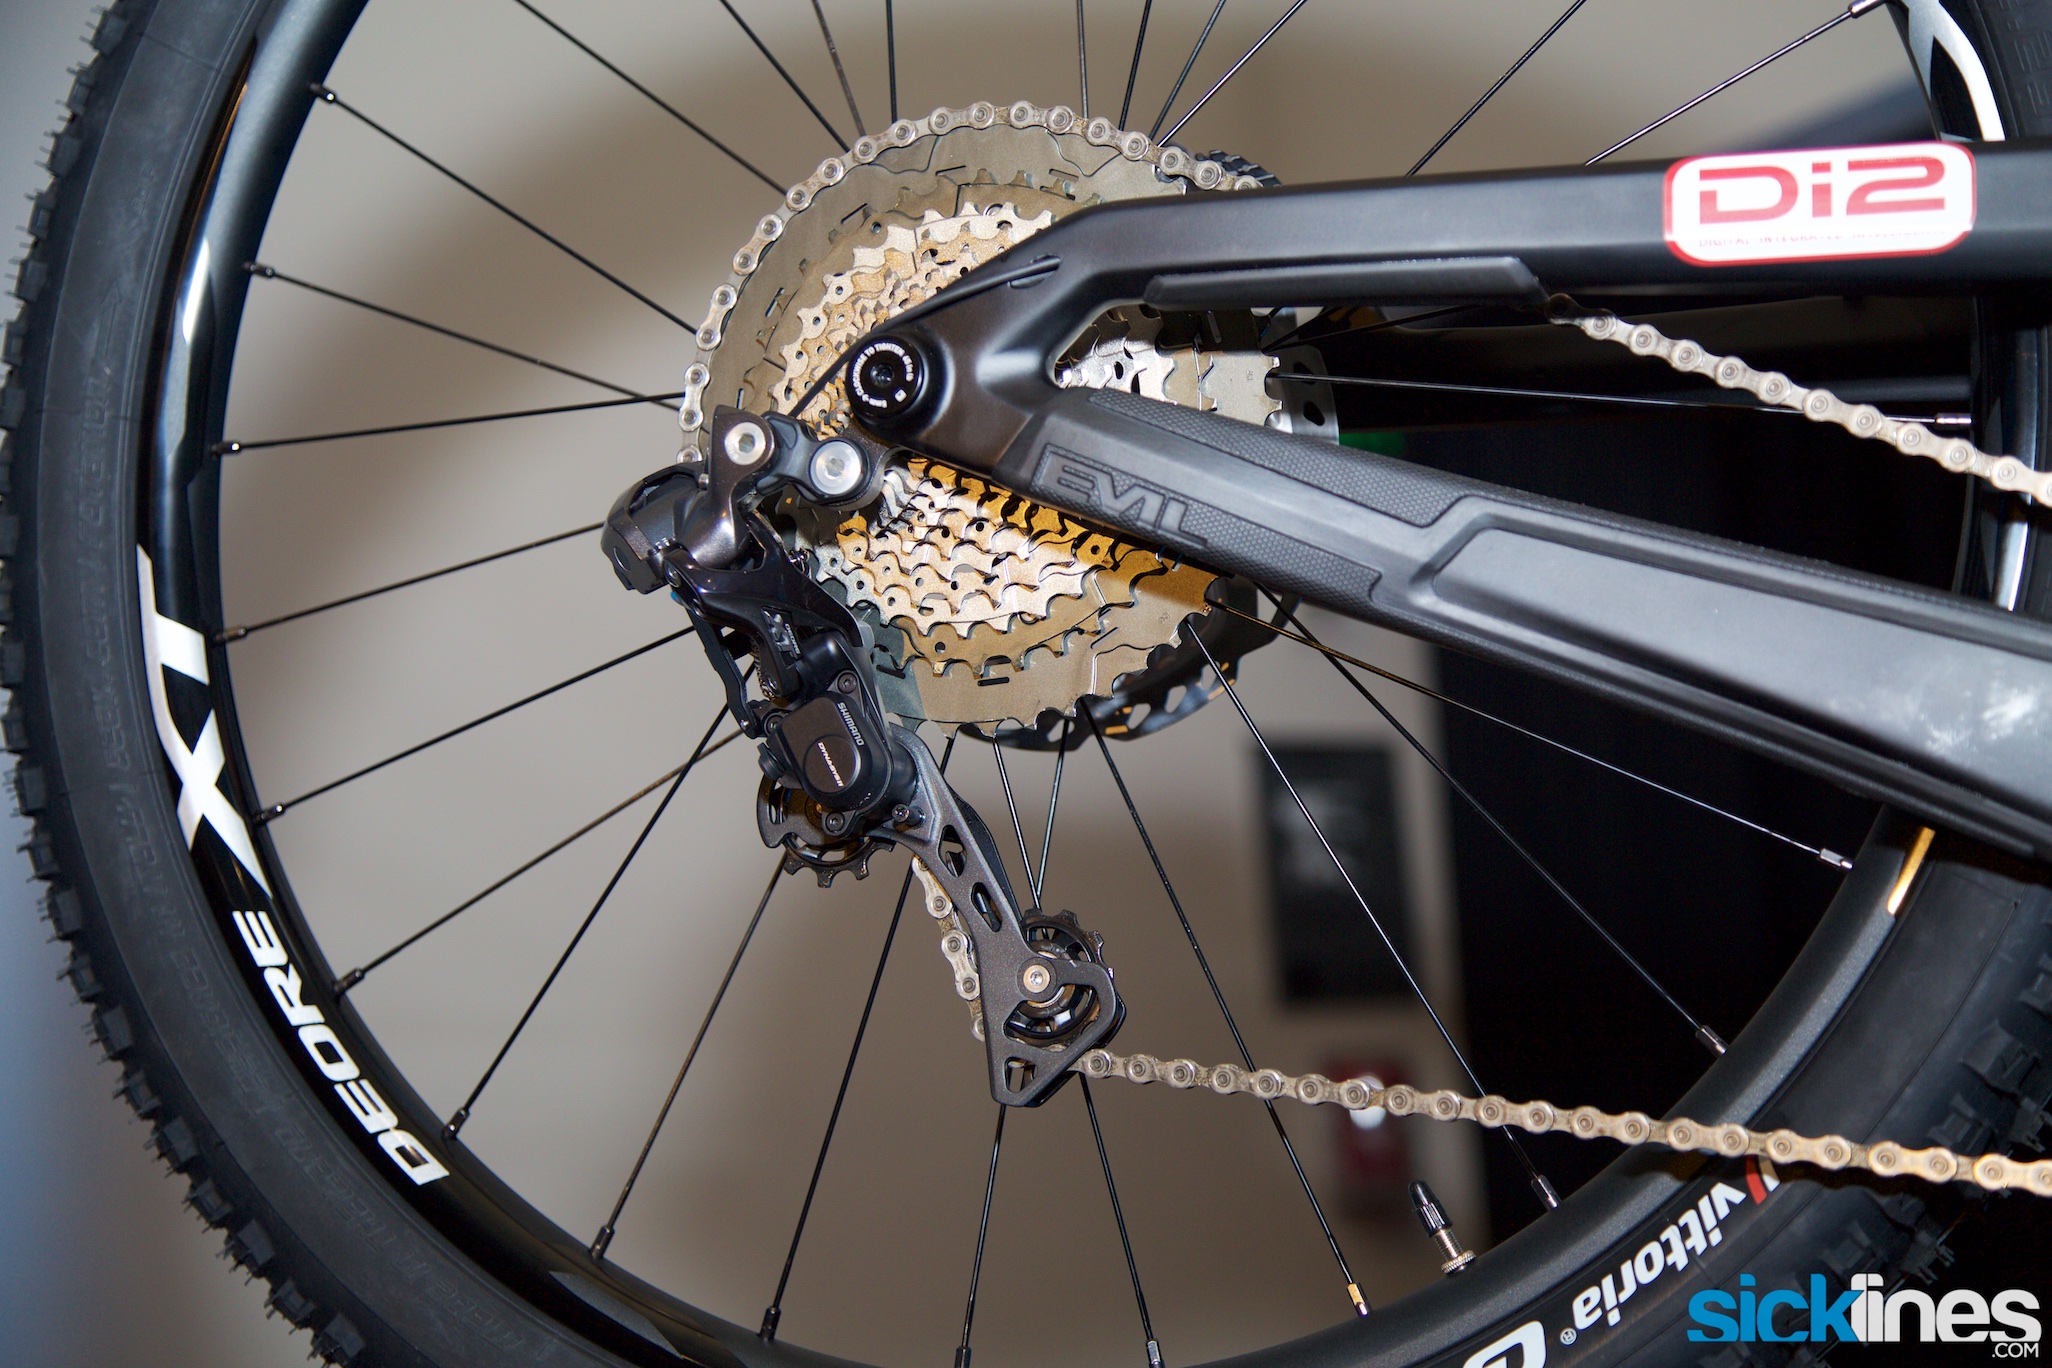
Overhead view of a Direct Mount hanger on a Thru-bolt MTB
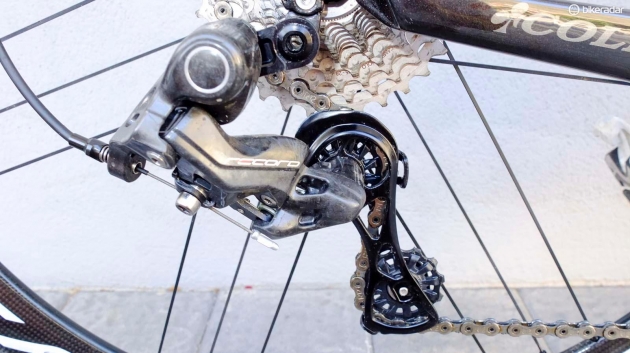
In the meantime, Shimano is simply ahead of the game. I just saw a picture of the new Campy 12-speed at www.BikeRadar.com. The rear derailleur is … you guessed it – Direct Mount!
An advertised advantage of moving the derailleur pivot back – it makes rear wheel removal easier. But a thru-bolt axle makes rear wheel removal harder. This aspect looks like a wash to me.
Two more esoteric observations on Ultegra 8000
1. The B-screw on the rear derailleur and the high and low limit screws on both derailleurs are 2mm hex bolts. I’m less than convinced of the wrench-worthiness of these miniscule bolts.
2. Referring to the overhead view of the Direct Mount hanger above, note that the derailleur attachment to the B-Link is a double shear pivot*** instead of a single shear pivot. Race car builders always prefer double shear pivot points in their steering and suspension designs because they are stronger and stiffer than single shear pivots. Shimano can double shear pivot the derailleur to a Direct Mount hanger because the inboard side of the hanger is not jammed in next to the cogs. If you’re having trouble sleeping, Google “Double Shear vs Single Shear” and read a few scholarly articles on the topic.
Tailwinds
Killa
*Thanks for the craft brews, BierMeister Mike!
**Stiffness is not the end game. It’s just something you claim as a manufacturer. The real test is shifting performance. I find that the 8000 does that wonderfully.
And strength? The hanger is supposed to be a weak link. That said, I’d like a hanger made of a material that is less subject to low-cycle fatigue than aluminum. Any ideas? I was thinking carbon fiber, but it needs to be bendable to adjust for a misaligned dropout.
***Thanks Dougie for pointing out to me the use of double shear pivots so many years ago. I never forgot.
First, a special shout-out to all thirty-seven of you who have subscribed to Esoteric Observations on Bicycling and Cycling! Thanks for your interest!
Last month I logged my initial comments on SRAM’s eTAP electronic shift system. At that time with over 1000 miles of riding I had yet to recharge the derailleur batteries. Not long after that my front derailleur battery threw me a solid red light, indicating “9-22 hours” of charge left. This happened in the garage, so it was no big deal. I recharged both batteries and slapped them back on. The day before that I had what in hindsight I believe are indications of weakening battery status.
First, I noticed that the system was not reliably transmitting gear change data to my Lezyne SuperGPS unit. At the time I just thought “That’s weird.”
Then, immediately after the guy next to me asked if I still liked my eTAP, I shifted to the big chain ring and dropped the chain on the outside. How embarrassing! I now attribute that, rightly or wrongly, to an almost discharged battery.
I‘ve ridden over 1500 miles with eTAP and that is the only shift failure I have experienced, and with a fresh charge the system is reliably transmitting to my GPS unit. I am still a fan.
I have grown to appreciate the “click equals shift” performance of eTAP. Shifting a mechanical system requires a certain degree of finesse. Push the lever too far and it shifts two gears. Don’t push the lever far enough and it clicks but doesn’t change gears. The skill becomes second nature after a while. But it is nice to simply press and release. (I’m still for some reason occasionally reaching for the left lever instead of the right to shift to a smaller rear cog.)
I have one more really esoteric observation. When I am walking my bike with my hand on the saddle the front wheel tends to wander a lot more than I recall before eTAP. I assume the absence of shift cables allows the headset to pivot more freely. It’s hard to be cool walking your bike when the front wheel is flopping back and forth.
In the next episode of Esoteric Observations on Bicycles and Cycling I’ll discuss Shimano’s “Direct Mount” derailleur standard. Check back later this month.
OK, It’s not as spectacular as landing two rocket boosters simultaneously, but I think SRAM’s eTAP wireless electronic shifting system is pretty cool!
SRAM came out with their eTAP wireless shift sytem in 2015. But I’m a Shimano guy, so I planned to wait for Shimano to offer a wireless system. My Tarmac SL3 is not set up for internal routing, so Di2 with all the wires doesn’t work for me. Well, this Christmas I got a wild hair and put the SRAM eTAP upgrade kit on my Amazon wish list. My wife got it for me! So I guess she does love me.
Today’s post is kind of a product review, but I plan to hit the more esoteric aspects of eTAP. I don’t want to be just another DC RainMaker.
There is a flipper behind each brake lever, pretty much like SRAM’s DoubleTap. Click the right flipper to shift to a smaller rear cog, click the left flipper to shift to larger rear cog, click them both together to change chainrings. That’s all there is to it. There are no other options, but I’ll bet SRAM is working on custom configurability via firmware, just saying. Oh, you can buy “blips” to mount on aero bars or wherever; they simply mimic the flippers (and they are hard-wired back to the levers). And there is a “blip-box” aero-bar version.
Setup truly is simple. Sync your shifters and derailleurs by pushing the buttons on each device (rear derailleur first and last). You don’t even need a bike. This makes for great fun at parties. Hold a shifter in each hand, place the derailleurs on the coffee table, and make them crawl like the robot in the final scene of Terminator 1.
Brief rant: SRAM’s instruction manual contains instructions in seven languages. OK, fine. But on each page appear a few lines of instructions in all seven languages. Come on, technical writers! Don’t make me thumb through all 58 pages of the instructions. Just point me to the English section and let me read the relevant 8 pages.
Anyway, you bolt on the derailleurs and do most of the adjustments without a chain. You don’t even need to have the shifters mounted on the bike. My shifters were laying on the workbench. Adjust the B-screw to get the right gap between the largest cog and the upper jockey wheel (6-8mm). On the front derailleur cage there are engraved index marks that you line up vertically and horizontally with the big chainring.
Install the chain, then fine tune the rear derailleur by pushing some buttons, and that’s about it.
The front derailleur knows the rear derailleur’s position, so it trims after each shift as required. That’s pretty cool!
Operation became intuitive after about ten minutes of riding. I still shift the wrong way every now and then. I don’t know why I would unconsciously reach for the left flipper to shift the rear cog…
The battery condition indicator lights on each derailleur and lever are supposed to turn yellow and then red as battery charge declines. I’ve ridden over 1000 miles and I’ve got nothing but green lights.
The derailleur batteries are interchangeable. This allows some clever dead battery recovery options which will be left as an exercise for the reader. An extra battery may be a good idea for an extended tour. The charger is a USB powered device, so a solar charger or USB power pack (which you’ll no doubt carry for your smartphone, IPad, etc.) would probably be handy if you’re camping.
When the bike is moving, motion sensors turn on the derailleurs to listen for a command. So putting the bike on the back of your car and driving six hours is like riding six hours. This is why you should remove the batteries during transport. The derailleurs go to sleep when the bike is static to minimize battery drain. You are also supposed to remove batteries for storage. I can’t figure out what constitutes storage? A month? A week? Overnight? Does anyone out there know how much power is required to operate a motion sensor in sleep mode? I’m thinking FitBit Zip, and I’m thinking – not much, but I don’t know.
Here’s something to think about. If you live on a houseboat or right next to train tracks, or if you store your bike leaning on a washing machine or something, the vibrations might prevent your derailleurs from going to sleep.
What about the batteries in the shift levers? I think this part of the system design is cool – The levers are just little transmitters. They send a coded signal to the derailleurs with each click. They use power only when you click them, like a garage door opener or a key fob. So the little 2032 watch batteries in the levers are said to (and easily should) last up to two years. If you’re heading out for a critical ride and it’s been a year or so, consider proactively changing the shifter batteries. This is not something you want to do on the side of the road. I may just change mine once a year when I change my smoke alarm batteries. That reminds me, I didn’t change my smoke alarm batteries this Christmas. Oops.
One annoying feature of the system for me was not being able to check front chainring selection with the levers. I know, just look down at the crank. But sometimes I’d rather not. With a Shimano mechanical system, I would push the left lever as if to shift to the big chain ring, and if it didn’t move I would know that I’m already there. If it did move I could continue pushing to shift or back off and stay on the small ring. The binary nature of the eTAP front shifting (push both flippers, it shifts) means you must change position to ascertain position. Then if the position you wanted is where you were, you are no longer there. Did that make sense?
Notice I said “was”. I learned that the system can transmit gear position information to my Lezyne Super GPS unit. So now I can glance at my screen and tell what gear I’m in.
Anybody remember the Shimano Flight Deck computer with on-screen gear indication from the Flight Deck shifters? It’s kinda like that but the info comes from the derailleurs, not the shifters, and wirelessly. And rather than a graphic representation of the cassette, a numerical position is indicated, e.g. F 1 / R 9 means small chainring / cog number nine of eleven.
One cool thing the Flight Deck did was calculate a “virtual cadence” from front wheel diameter, speed, and gear ratio. Virtual cadence would be a cool little app. It should be “relatively straightforward for one practiced in the art” (that was for my patent attorney friend Tom) to write the necessary code for a GPS unit or smart phone. Of course “actual cadence” is now pretty easy to measure and transmit. I can envision “one practiced in the art” incorporating power data along with cadence, and hacking signals back to the derailleur to automate gear selection…
…but then again, Musk’s center booster crashed into the ocean!
Other stuff that I want to say about eTAP:
You can hold a shift button down to run through the gears, but you can also click as fast and as many times as you want. I have not felt a need to use the “multi-shift mode”. Contrast this with mechanical shifting where the two or three gear shift option is pretty handy.
You do realize there are still brake cables, right?
There is a long cage version called WiFLi that can handle up to a 32 tooth cog. The standard short cage version handles up to 28 teeth.
You can shift the derailleurs by pushing the buttons on the derailleurs themselves. This is very handy on the repair stand, where you’d need three hands and long arms to reach both flippers and turn the crank to shift the front derailleur. Pro mechanics are said to be temporarily pairing a blip box to the bike and using that to shift on the workstand.
Shifting the derailleurs with the buttons on the derailleurs could save your bacon if one or both of the 2032 watch batteries in the shifters dies in the middle of nowhere. I’m not saying you should reach down and do this while riding. (Have the team car pull alongside and let the mechanic do it.)
The eTAP Upgrade Kit contains two derailleurs, two shifter/brake levers, two lithium ion batteries, a charger, a firmware update dongle (though there have been no firmware updates published), brake cables, and a few mounting bolts and other small bits. It comes in about twelve pounds of packaging, I kid you not.
I have found the Upgrade Kit to be completely compatible with my Shimano crank, chain, cassette, and brake calipers.
Now I just have to decide what to do with the shift-cable stops on my downtube.
How often do you think about the coefficients of thermal expansion of the various materials used in the construction of your bicycle? All the time, right?
Steel, titanium, aluminum, carbon fiber; they all have distinct properties that make them better or worse for specific applications. Strength and stiffness are arguably the most important properties for structural elements of a bicycle. Other important properties include corrosion resistance, fatigue resistance, machinability, and even appearance. I think brushed titanium is a rather attractive look.
But today I want to talk about coefficient of thermal expansion, or CTE. To be more specific I am talking about linear CTE. The units of a linear CTE are length per length per temperature change. For instance: inch per inch per degree Fahrenheit.
The CTE’s of most structural materials are very small. As an example, heat a 1” long steel bar one degree Fahrenheit and its length increases to about 1.0000065”. (CTE of steel = about .0000065 inches/(inch degree F).
Here’s a table of CTE’s for common bicycle materials of construction. Keep in mind that the CTE of an alloy can vary quite a bit depending on proportions of specific elements present.
Material
Coefficient of Thermal Expansion 10-6 inches/(inch degree F)
Notice that aluminum has the greatest CTE of any of the materials commonly used on bicycles and components. This is a very useful fact.
And yes, carbon fiber can have a negative CTE! According to Performance Composites Inc. “Graphite fiber has a negative coefficient of thermal expansion, which means when it is heated it will shrink. When the graphite fibers are put into a resin matrix (positive CTE), the composite can be tailored to have almost zero CTE.”
So what? Do you care if your bicycle gets unmeasurably larger as the day heats up? I’m certainly not going to stop to lower my seatpost. But it gets interesting – and useful – where different materials come together.
I’ve written before about the use of heat to remove a recalcitrant pedal from a crank. That works because the CTE of aluminum is higher than the CTE of steel. The hole in the crank expands at a higher rate than the spindle of the pedal, so the interface becomes looser and easier to unscrew. (The crankarm also gets thicker at a higher rate than the length of the spindle increases, which probably tightens the interface. There’s no free lunch, but obtaining relative motion between the surfaces certainly helps to free things up.)
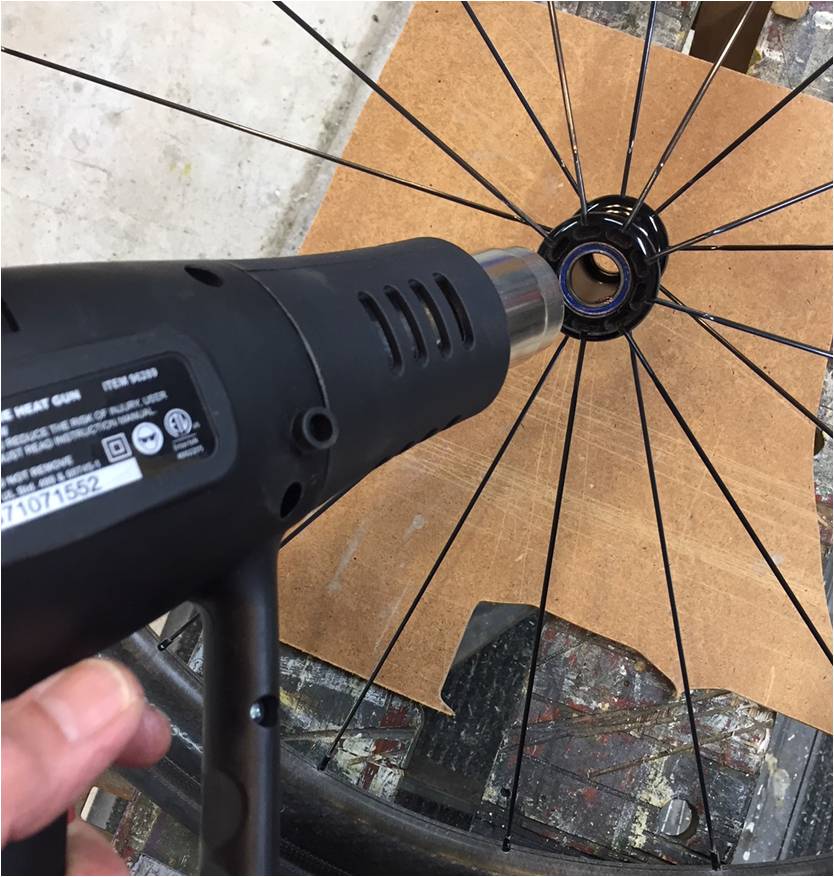
I’ve found another opportunity for application of differential thermal expansion – press-fit bearing installation and removal. I was replacing bearings in a ZIP 303 hub when it occurred to me. The bearing race is steel (or possibly stainless steel). The hub is aluminum. Heating the assembly made it easier to drive out the old bearings because the ID of the aluminum hub expanded more than the OD of the steel bearing.
Caveat: With a good heat gun you could cook the grease and seals in the bearings – and burn your hands. But presumably you’re removing the bearings to discard them. A heat gun is not going to overheat the aluminum of the hub.
The advantage of differential CTEs is even greater for installation of new bearings. You can heat the aluminum hub, and keep the steel bearings cool until you are ready to press them in. This way the hole in the hub is as big as it can be and the bearing is as small as it can be. With this technique I was able to press in my 303 hub bearings most of the way by hand!
What about press-fit components on frames, such as bottom bracket bearings and headset cups. I have used heat successfully to ease removal of a pair of steel headset cups out of an aluminum frame. But you want to be very careful heating a frame.
In closing:
Be very gentle with the use of heat around carbon fiber or painted aluminum. Paints and resins are organic materials. They can melt and even burn. My rule of thumb for heating carbon fiber is if I can’t hold it in my hand it’s too hot. Consider a bucket of hot water for controlled heating of carbon fiber.
If a metal bearing is pressed into a carbon fiber shell, don’t even bother heating it to loosen it. Heat will only make it tighter because the steel expands more than the carbon! Try giving it an ice bath?
 Yes, this relates to today’s Esoteric Observation on Bicycles and Cycling – Image from Space.com