If I had a nickel for every time I said that upper headset bearings never wear out, I’d have… a few bucks anyway. Upper headset bearings usually do last a very long time. Lower headset bearings take all the pounding, and they are located in the second dirtiest area of a bike, at the top of the fork where the front wheel sprays up road grime.
The dirtiest area is at the back of the bottom bracket. (Hey, let’s mount the rear brake there!) But this is a story of headset bearings, not bottom brackets and brakes.
A friend showed up in the garage recently with his tri-bike. It had serious problems, not least of which was a rear bar-end shifter that went slack in the middle of a full Ironman, requiring him to ride the remainder of a hilly bike leg on the 11 cog. And also not least was a completely seized rear brake mounted guess where? But this is a story of headset bearings, not shifters and brakes, so on to headset bearings.
The most serious problem was a fork steerer tube that had been sawn partially through by a seized headset bearing. The bearing had been replaced, but the damage was done. I knew something was wrong when I could not dial in a proper headset adjustment. When I took it apart, I was quite alarmed.
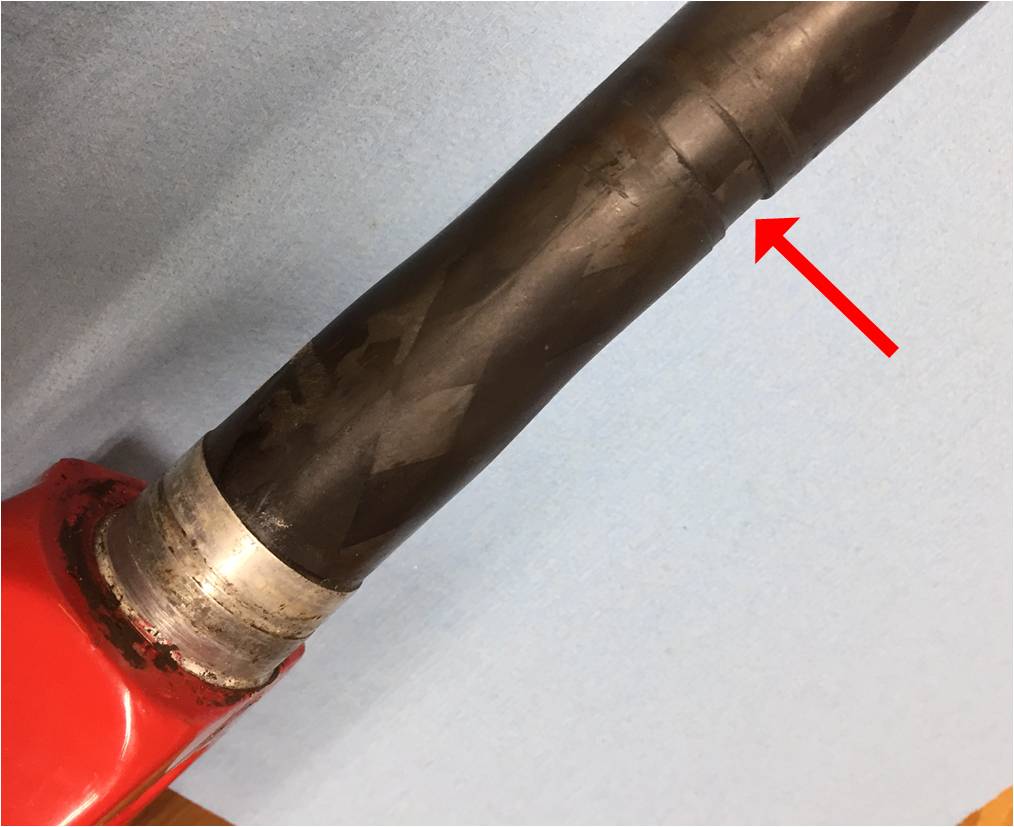
Normally the inner race of a headset bearing is static with respect to the fork and rotates with respect to the outer race, of course. But if the bearings becomes seized, the fork rotates back and forth inside the inner race (or the entire bearing rotates inside the bearing cup; I guess forks are cheaper than frames.) Anyway, in an abrasion war, hardened steel wins every time against a carbon fiber/resin composite.
I don’t know how long the upper bearing was seized, but it couldn’t have been much fun driving the bike in this condition. Maybe this is why he was erratic. I thought it was just because he was a triathlete. I’m sorry. That was a mean joke. The guy rides very well and is an accomplished road cyclist.
But upper headset bearings last forever. So what went wrong? In a typical road cycling position, the rider’s chin is behind the headset. However, in an aggressive triathlon/time trial position, the rider’s chin is well in front of the headset. I think this leads to sweat dripping into the bearings. The rusted stem bolts were a clue. It occurs to me that a bike used on a stationary trainer might also be prone to this issue.
Here are some ideas/suggestions on this topic:
- Threadless headsets are easy to service. So a regular inspection is a good idea. While you’re at it, clean up the steerer tube and check it for cracks or other defects. Here’s a Global Cycling Network video on headset maintenance.
- Pro tips for headset work:
- Unbolt the front brake from the fork (usually a 5mm allen screw in the back of the fork) and just let the brake dangle, so you don’t have to disconnect the brake cable to lift the stem off of the steerer tube.
- Mount the bike in your workstand with the front end down so that the bars/stem can hang from the cables without kinking.
- A bit of steerer tube deformation under the upper bearing compression ring is not unusual, but nothing like the material removal in the picture above. If the deformation prevents proper bearing adjustment, it’s time for a new fork. I have an old fork hanging in the garage with exactly this problem.
- If you can’t properly adjust a headset, it might be a simpler problem of not enough spacers. The total height of your stem and spacer stack must exceed the height of your steerer tube by enough (3-4mm?) so that when you tighten the stem cap, it pushes down on the stack. If the steerer tube height is near or equal to the height of your stack, the cap will just tighten down against the steerer tube.
- Don’t use carbon assembly paste on the steerer tube. If it gets between the bearing and the steerer it makes excellent grinding compound. There is plenty of clamping force between the stem and the steerer tube. Besides, in a crash, would you rather have your bars rotate or snap off the steerer tube?
- Do I have to tell you to follow manufacturer’s torque recommendations (usually 5nm) for stem bolts?
- Some fork and frame manufacturers have specific guidelines about spacers (maximum/minimum number and location) and internal compression supports to prevent crushing the steerer tube with the stem.
Bonus picture: Here is a steerer tube that was about to fail! What looks like a hacksaw cut is actually a crack. The rider felt his handlebars getting a little “soft” and finished his commute “gingerly”.
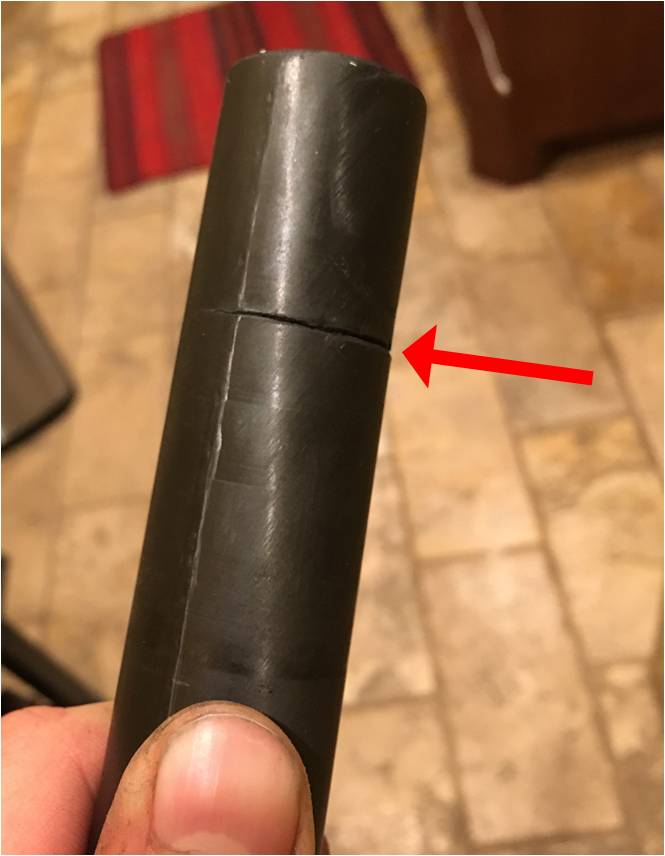
I’m not sure this failure had anything to do with headset bearings. It is just sort of interesting in a scary kind of way.
That’s all for now. Thanks for reading!
Killa
My steer tube just cracked yesterday exactly like the bonus pic (looks like a hacksaw). I think this is caused by a loose stem. Did you happen to check the stem or spacer for roughness where it aligned with the crack? I bet the crack was on the lead facing side of the tube, correct?
Hi Chris, thanks for reading my blog! I’ve asked my friend that sent me the picture for more details on the break. I’ll report back when I know more.
Thanks!
Here’s some pics of mine. http://imgur.com/a/pu7yz
Chris, thanks for the pictures. Yes, that looks like the same failure as on my friend Tammer’s bike, which was as you guessed, on the front. You mentioned loose stem as a possible cause. That might be allowing the carbon strands to be placed in compression in a concentrated area, a load for which they are not designed. On a related topic, a friend just brought in an Ultegra 6800 crank that failed (The two halfs of the right side hollowtech assembly separated.) I thought, wow, this is unusual. Then I googled for that failure and found several conversations showing the same failure mode.
I neglected to ask, did your failure cause you to crash, or did you catch it, like Tammer, before it totally separated? And if you crashed, are you alright?
Hey, I recently built a bike and after a test ride (less than 5km), I took off the stem to inspect the steerer tube and noticed some (hopefully) scratches. They are shallow, seem to be surface, though my nail does get caught in them. They are on the front side of the fork (facing front of bike) like you guys mentioned.
I don’t think my stem was particularly loose, though I may have been stupid and left it at 4NM and the headset was fine with no play. I have since tightened it to 5NM and I also tightened the top cap a bit more than last time.
Should I be worried? Kinda paranoid about carbon lol, but can’t exactly put a finger on what went wrong. Though, I’m happy I know sooner than later. Here are some picture: https://imgur.com/a/0cWtcsS
Any advice or opinions would be really appreciated!
Dev, my first question would be why you thought you should inspect the steerer tube after a three mile ride. Was this a new or used fork? All that said, the pictures you show suggest a very minor superficial scratch. I’ve seen a lot worse. I’ve ridden a lot worse! But I can’t in good conscience recommend that you ride a bike you are unsure of. I have to recommend that you take it to a dealer and say “Hey, is this okay to ride?”
Is the mark at the height where the bottom of the stem was? Examine your stem and make sure the bottom inner edge is slightly rounded, like the top inner edge of the headset spacer ring in your photo.
Stem (5nm), seatpost (5nm), and crankarm pinchbolts (12nm) – The three places I always use a torque wrench!
Thanks for the reply! Yes, it was a new bike and just recently built up. I opened it up on a whim, didn’t feel like anything was wrong, no play in the headset or anything. It’s my first time working with a carbon steerer so I wanted to make sure.
Upon further inspection, I think the lines may actually be from the spacers. There is also a very faint line below the one pictured (https://imgur.com/a/6nkznf2). I had the stem right at the top (above 3 10mm spacers) and no spacers above. I contacted the company I got the bicycle from before doing this and they said this should be fine. Now I’m thinking it’s best to leave a spacer above the stem, since the top 3-4 mm of the stem weren’t clamping on anything, which could cause additional compression stress and slipping? The compression plug itself isn’t long either (https://www.biketiresdirect.com/product/fsa-compressor-1-1-8-expander-plug-and-top-cap)
I’m planning on doing this and checking again in a few weeks. I’ll tighten the compression plug to 7NM-8NM (instructions/company said 6-9NM) and stem to 5NM. Hopefully that resolves it, of course, the lines might just be from the friction of centering the stem, and I may be overdoing precautions. Thank you for your time!
I had just finished an interval/sprint and while at a red light and noticed the bars wiggle ever so little. I immediately assumed it was just a loose stem, but it was worse. I was lucky I caught it. Even crazier is the fact that i had just competed in a crit the day before…
Any info on if the stem showed any sign of defect? I torque check my key points like the stem, and imagine it getting loose is the only explanation. Its hard to convince myself that its bad carbon. That said, I am all but certain that the break happened over time and not at once.
Great site, love reading your posts.
This is not a critique, nor correction, more in terms of thinking out loud. About (not) using carbon mounting paste.
For all I know, carbon parts can be dammaged if they slips when it torqued. Installation instructions sometimes stress that: to set it in position with pinch bolts loose, so it slides freely. Not as forgiving as metal parts in those terms.
Not using carbon friction paste could result in parts slipping even when torqued to the recommended torque. Exceeding recommended torque can cause damage from too much (pre)load.
So I’d rather use mounting paste, just do it carefully – only after the fork is inserted, on the part where the bars go. Making a note to wipe it off if/when removing the fork.
And I think sweat is what causes the upper bearing damage a lot more likely. While mud and grit is the nemesis of the lower bearing. Both suffering from micro-vibrations that happen on fast descending on paved roads – which displaces the lubricant, without enough bar rotation to replentish it.
Relja, Thanks for reading and for your thoughtful comments. I agree with everything you said.
For sake of discussion, a reason to forego use of carbon paste on the steerer tube is to allow slippage in a crash. A bit of bar rotation might absorb enough impact load to save something (steerer tube?) from breaking.
For the same reason I “under-tighten” my brake lever fixing bolts. I’d rather have a lever fold in during a crash than break off.
I’ll admit that in a pro race situation bar rotation in a crash may not be a good thing, where the ability to jump back on the bike trumps damage prevention.
On a related note, I’ve read that pros use aluminum bars (except in low risk situations like time trials) because they bend while carbon bars break.
Apologies in advance for the Tarzan English. 🙂
Leaving things not super-tight makes perfect sense for metal parts. For carbon – slippage can cause damage of a first layer, that grows in time (from sweat among other things).
Letting a not-too-tightly-torqued-but-still-torqued stem slip on the fork’s steering column could be a risky move in those terms. Having it properly torqued is more likely to cause breaking of bars, but might completely keep the stem in tact.
To make my stance clear: not trying to do any “fear mongering”, quite the contrary, just due, common sense caution. Also, for full disclosure, I’m not a carbon material expert, and didn’t read nearly as much literature on carbon-fiber (composite) material failure modes, as I have on metals (steel especially). So do take all written with a grain of salt and use your judgement. Now that’s “out of the way”:
I’ve seen carbon parts break. Unlike metals (steel, aluminium, titanium) – cracks are often not visible at the surface, for easy inspection (without ultrasound). The only thing one can rely on is use (accident) history (if known) and surface scratches (if they appear).
So, to be on the safe side, as you’ve said in the post, inspection from time to time is a good precaution (same goes for contemporary hollow crank axles). Visible scratches from a slipped stem on the steerer tube would not let me have faith in the component safety when riding (other’s risk tollerance level, as well as OCD 🙂 may differ).
That’s why I’d rather clean and re-lube bearings, using the occasion to inspect the steerer tube when doing so, but stick with proper mounting pastes (both for carbon, and metal, including bolts – winter cycling has taught me the love of mounting pastes 🙂 ).
Relja, I understand your concerns. I did a little digging because I had read somewhere that Trek says not to use carbon paste on the steerer tube. I found the Trek owners manual online and indeed they say:
“Do not apply carbon prep between the stem and a carbon fork steerer. Gravity, heat, and vibration work together to allow the carbon prep to move down the steerer into the headset spacers. Carbon prep is somewhat abrasive and due to the slight motion involved with the headset spacers, carbon prep can wear away steerer material, causing the fork to lose strength.”
Never thought of that. It does make sense. Spacers and compression plug keep the stem from moving up/down on the steerer column, so the stem pinch bolts are mostly left with handling the bar turning torque, unlike (drop) bars to stem interface that also needs to prevent the rider’s weight from twisting them.
Seems not using carbon paste on stem-steerer interface is a lesser of two evils and I stand corrected – thanks for taking the time to clear that up.
Hello. I will start by appreciating how good your post is as it was very insightful for me. Thanks for posting this.
I research this topic every 6 months or so (at the time of when i open up my bike’s headset for inspection and servicing) and luckily this time i was able to land on this webpage.
I face the same issue on my bike. I caught it very early on, when it was only a scratch (right most picture). Over time the scratch has turned in to a definite visible groove which was not equal and now it is more or less equal both front and back after about 5000kms. So this is definitely progressing in my case. Since this started happening very early I attribute this to some out of tolerance manufacturing and not just a loose headset (that i do admit i might have ridden with for a few hundred kms)
Pictures here https://imgur.com/bNPWvkO
As I said, clearly this is something I might have to live with, so I have been thinking what I could do to slow down or prevent further wearing. Some of the ideas i have had are:
1. Put some tape around steerer tube to allow split ring to grip it better.
2. Add a plastic sleeve around steerer tube with the same purpose in mind as above.
3. Have a new split ring fabricated to get tighter fit around steerer tube.
Another obvious undesired implication of this wear is the reduced strength of the steerer tube. During my research I found this. Seems like a legit solution to strengthen the steerer tube at the expense of weight. Not sure how this insert will impact fork’s behaviour dynamically under load:
https://www.bigandtallbike.com/Steer-Tube-insert-for-carbon-fork–238mm-Diameter_p_380.html
I would love to hear your thoughts on this.
Thanks
Ahmed
Hi Ahmed, I’m glad you found my article useful. I have a few thoughts that might be helpful.
First, about cause:
Loose headset, maybe.
Seized bearing, would be obvious.
Using carbon assembly paste on the steering tube. Don’t do this.
Low quality carbon layup on the steerer tube- too soft.
Effects:
Obviously you’re concerned about strength. The Zinn insert is an excellent addition to strengthen/stiffen the steerer tube.
There’s another problem. The indentation prevents the split ring from sliding freely down to properly adjust the headset.
Some split rings are taller than others. look around. You may find one with a longer extension below the tapered part. This may bridge the lower edge of the indent and allow better headset adjustment.
Best of luck.
Okay. So, the bearings (top and bottom) are definitely not seized. I inspected them just yesterday.
Also the carbon paste was put on the steerer when my bike was originally assembled that I wiped off of it at 500km mark inspection I did and haven’t reapplied any back on it again.
To make sure that my headset wasn’t loose, I have tried to tighten the headset to the point that it didn’t steer freely and then loosened just a few notches. At this point if I rock my bike firmly but slowly and put my finger on the gap above and below the headtube to feel relative movement, I only feel a very slight movement (you would miss it if not paying attention) that feels more like a change in gap between headset cup and head tube top rather than the displacement felt in case of a loose headset. It feels more like due to the flex in the system than looseness of headset. You think this is headset’s looseness? Or is it due to the steerer wear that is preventing headset being preloaded fully? Or is this thing of no concern at all?
Low quality carbon layup is definitely a suspected cause because it is a Cannondale Synapse and I already do have a clicking/creaking BB30A bottom bracket that I have to keep servicing using loctite every 500km-800km. I do still love it, a lot! 🙂
About the Zinn inserts, you think they could prevent a catastrophic steerer tube failure?
Thanks for the tip about taller split rings. I will check this out.
I believe the Zinn insert will indeed reduce the likelihood of a steerer tube failure. But this is my opinion
On the topic of steerer tube inserts, read this Cervelo fork manual. It describes the installation of an aluminum sleeve after cutting the fork to length, as matter of standard practice.
https://www.cervelo.com/media/gene-cms/f/o/fork_owners_manualv3.pdf
Hmm. That is interesting. I didn’t know some manufacturers put metallic inserts as part of standard setup!
Thanks again for your time and sharing your thoughts!